Intermec PB42 PB42/PB42c Portable Receipt Printer User's Guide - Page 25
Serial Port Settings on the PB42/PB42c, To connect the PB42/PB42c to a PC
 |
View all Intermec PB42 manuals
Add to My Manuals
Save this manual to your list of manuals |
Page 25 highlights
Serial Port Settings on the PB42/PB42c Parameter Baud rate Data bits Parity Stop bits Flow control Default Setting 115200 8 None 1 Hardware Note: The PB42/PB42c only supports CTS flow control. You must disable DSR flow control in your printing application while using serial communications with the PB42/PB42c. To connect the PB42/PB42c to a PC 1 Connect the 8-pin circular DIN connector to the serial port on the PB42/PB42c. 2 Connect the other end of the serial cable to a serial port on the back of your PC or to a serial adapter on your CK60. Serial cable Serial port Connecting the PB42/PB42c to the Serial Port of a PC PB42/PB42c Portable Receipt Printer User's Guide 25
-
 1
1 -
2
-
3
-
4
-
5
-
6
-
7
-
8
-
9
-
10
-
11
-
12
-
13
-
14
-
15
-
16
-
17
-
18
-
19
-
 20
20 -
 21
21 -
 22
22 -
 23
23 -
 24
24 -
 25
25 -
 26
26 -
 27
27 -
 28
28 -
 29
29 -
 30
30 -
31
-
32
-
33
-
34
-
35
-
36
-
37
-
38
-
39
-
40
 |
 |

PB42/PB42c Portable Receipt Printer User’s Guide
25
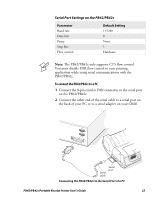
Serial Port Settings on the PB42/PB42c
Parameter
Default Setting
Baud rate
115200
Data bits
8
Parity
None
Stop bits
1
Flow control
Hardware
Note:
The PB42/PB42c only supports CTS flow control.
You must disable DSR flow control in your printing
application while using serial communications with the
PB42/PB42c.
To connect the PB42/PB42c to a PC
1
Connect the 8-pin circular DIN connector to the serial port
on the PB42/PB42c.
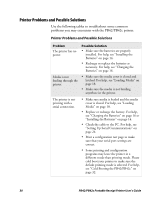
2
Connect the other end of the serial cable to a serial port on
the back of your PC or to a serial adapter on your CK60.
S
eria
l
ca
bl
e
S
eria
l
port
Connecting the PB42/PB42c to the Serial Port of a PC