JVC DVP7U Instruction Manual - Page 25
To choose whether or not the following displays, DISPLAY
 |
UPC - 046838161001
View all JVC DVP7U manuals
Add to My Manuals
Save this manual to your list of manuals |
Page 25 highlights
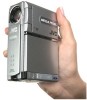
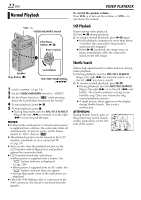
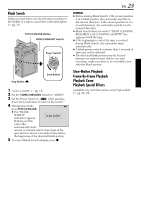
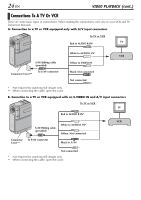
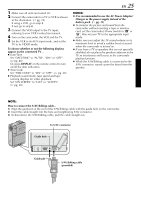
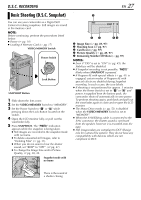
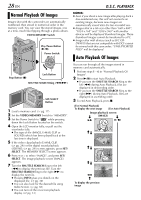
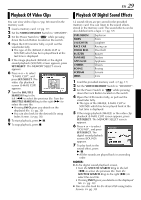
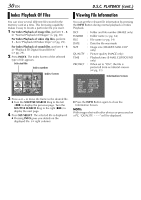
1 Make sure all units are turned off. 2 Connect the camcorder to a TV or VCR as shown in the illustration. (੬ pg. 24) If using a VCR, go to step 3. If not, go to step 4. 3 Connect the VCR output to the TV input, referring to your VCR's instruction manual. 4 Turn on the camcorder, the VCR and the TV. 5 Set the VCR to its AUX input mode, and set the TV to its VIDEO mode. To choose whether or not the following displays appear on the connected TV... ● Date/Time Set "DATE/TIME" to "AUTO", "ON" or "OFF". (੬ pg. 48) Or, press DISPLAY on the remote control to turn on/off the date indication. ● Time Code Set "TIME CODE" to "ON" or "OFF". (੬ pg. 48) ● Playback sound mode, tape speed and tape running displays for video playback Set "ON SCREEN" to "LCD" or "LCD/TV". (੬ pg. 48) EN 25 NOTES: ● It is recommended to use the AC Power Adapter/ Charger as the power supply instead of the battery pack. (੬ pg. 11) ● To monitor the picture and sound from the camcorder without inserting a tape or memory card, set the camcorder's Power Switch to "A" or "M", then set your TV to the appropriate input mode. ● Make sure you adjust the TV sound volume to its minimum level to avoid a sudden burst of sound when the camcorder is turned on. ● If you have a TV or speakers that are not specially shielded, do not place the speakers adjacent to the TV as interference will occur in the camcorder playback picture. ● While the S/AV/Editing cable is connected to the S/AV connector, sound cannot be heard from the speaker. NOTE: How to connect the S/AV/Editing cable... 1) Align the guide pin at the end of the S/AV/Editing cable with the guide hole on the camcorder. 2) Insert the cable straight into the hole and neighboring S/AV connector. 3) To disconnect the S/AV/Editing cable, pull the cable straight out. To S/AV connector Guide hole Guide pin S/AV/Editing cable (provided)
-
 1
1 -
2
-
3
-
4
-
5
-
6
-
7
-
8
-
9
-
10
-
11
-
12
-
13
-
14
-
15
-
16
-
17
-
18
-
19
-
 20
20 -
 21
21 -
 22
22 -
 23
23 -
 24
24 -
 25
25 -
 26
26 -
 27
27 -
 28
28 -
 29
29 -
 30
30 -
31
-
32
-
33
-
34
-
35
-
36
-
37
-
38
-
39
-
40
-
41
-
42
-
43
-
44
-
45
-
46
-
47
-
48
-
49
-
50
-
51
-
52
-
53
-
54
-
55
-
56
-
57
-
58
-
59
-
60
-
61
-
62
-
63
-
64
-
65
-
66
-
67
-
68
-
69
-
70
-
71
-
72
-
73
-
74
-
75
-
76
-
77
-
78
-
79
-
80
-
81
-
82
-
83
-
84
-
85
-
86
-
87
-
88
-
89
-
90
-
91
-
92
-
93
-
94
-
95
-
96
-
97
-
98
-
99
-
100
-
101
-
102
-
103
-
104
 |
 |