JVC GY-HM710U GY-HM710 ProHD Camcorder 141 page owner's manual (includes GY-HM - Page 42
Basic Shooting Procedures
 |
View all JVC GY-HM710U manuals
Add to My Manuals
Save this manual to your list of manuals |
Page 42 highlights
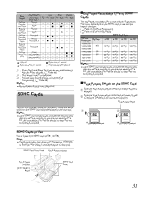
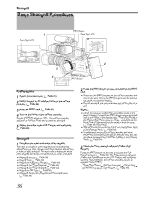
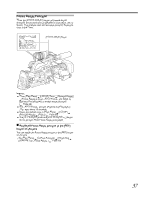
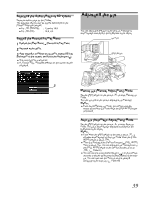
Shooting Basic Shooting Procedures 1 Front Tally Lamp [REC] Button Back Tally Lamp 3 2 5 4 [POWER] Switch [REC] Button Preparations 1 Attach the accessories. (A Page 21) 2 Supply battery or AC adapter power to the camera recorder. (A Page 22) 3 Insert an SDHC card. (A Page 31) 4 Turn on the power of the camera recorder. Set the [POWER] switch to AONB. The camera recorder starts up in Camera mode and is ready for shooting. 5 Adjust the angle of the LCD monitor and viewfinder. (A Page 28) Shooting 1 Configure the video and audio input settings. You have to configure video settings such as brightness adjustment (iris, gain, shutter) and white balance adjustment in order to start shooting. You also have to adjust the audio input settings and audio recording level for audio recording. ● Adjusting the Iris (A Page 39) ● Setting Gain (A Page 40) ● Setting the Electronic Shutter (A Page 40) ● Adjusting the White Balance (A Page 42) ● Adjusting the White Shading (A Page 44) ● Setting the ND Filter (A Page 45) ● Adjusting Audio Input Settings and Recording Level (A Page 46) 2 Press the [REC] button to start recording to the SDHC card. ● There are two [REC] buttons on the camera recorder and one on the lens. Any of the [REC] buttons can be used to start/stop recording by default. ● During recording, the front and back tally lamps light up in red. Memo : ● If both the slots are loaded with recordable cards in the factory default, pressing the [REC] button starts recording only to the media in the selected slot. When [Slot Mode] in the [Record Set] menu is set to ADualB, recording can be performed simultaneously to the cards in both the slots. ( A Page 57 [Dual Rec]) ● Tally lamps can be turned off with [Front Tally]/[Back Tally] in the [Others] menu. (A Page 93) ● To separately control this camera recorder and other equipment connected to the [IEEE1394] terminal, you can configure the setting at [1394 Rec Trigger] in the [Others] menu. (A Page 94) 3 Check the most recently captured images (Clip Review). Press the [RET] button on the lens to activate the Clip Review function (A Page 56). The most recently captured images are played back on the LCD monitor and viewfinder screens. After playback, the camera recorder returns to standby mode (STBY). * When [Main Menu] B [Camera Function] B [Switch Set] B [LENS RET] is set to AClip ReviewB (A Page 79) 36
-
 1
1 -
2
-
3
-
4
-
5
-
6
-
7
-
8
-
9
-
10
-
11
-
12
-
13
-
14
-
15
-
16
-
17
-
18
-
19
-
20
-
21
-
22
-
23
-
24
-
25
-
26
-
27
-
28
-
29
-
30
-
31
-
32
-
33
-
34
-
35
-
36
-
 37
37 -
 38
38 -
 39
39 -
 40
40 -
 41
41 -
 42
42 -
 43
43 -
 44
44 -
 45
45 -
 46
46 -
 47
47 -
48
-
49
-
50
-
51
-
52
-
53
-
54
-
55
-
56
-
57
-
58
-
59
-
60
-
61
-
62
-
63
-
64
-
65
-
66
-
67
-
68
-
69
-
70
-
71
-
72
-
73
-
74
-
75
-
76
-
77
-
78
-
79
-
80
-
81
-
82
-
83
-
84
-
85
-
86
-
87
-
88
-
89
-
90
-
91
-
92
-
93
-
94
-
95
-
96
-
97
-
98
-
99
-
100
-
101
-
102
-
103
-
104
-
105
-
106
-
107
-
108
-
109
-
110
-
111
-
112
-
113
-
114
-
115
-
116
-
117
-
118
-
119
-
120
-
121
-
122
-
123
-
124
-
125
-
126
-
127
-
128
-
129
-
130
-
131
-
132
-
133
-
134
-
135
-
136
-
137
-
138
-
139
-
140
-
141
 |
 |
