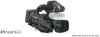
JVC GY-HM710U GY-HM710 ProHD Camcorder 141 page owner's manual (includes GY-HM - Page 45
Adjusting the Iris
 |
View all JVC GY-HM710U manuals
Add to My Manuals
Save this manual to your list of manuals |
Page 45 highlights
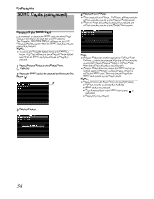
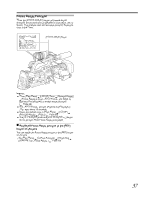
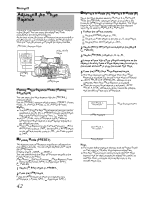
Selecting the Aspect Ratio of SD Videos Select an aspect ratio for the images. The available options vary as follows depending on the [System Definition] setting. ● For AHD (MPEG2)B : Fixed at 16:9 ● For ASD (DV)B : 16:9, 4:3 Setting the Record Format Menu 1 Display the [Main Menu] B [Record Format] menu. 2 Set each of the items. 3 After setting is complete for all items, select [SET] at the bottom of the screen, and press the Set button (R). ● The record format is switched. ● A APlease WaitB message appears on the screen during switching. IRIS A M T W RET Adjusting the Iris You can adjust the aperture of the lens iris manually or automatically according to the brightness of the object. Iris Ring [IRIS] Switch 3 Manual Iris (Manual Adjustment) Mode Set the [IRIS] switch on the lens to AMB to enter Manual Iris mode. Turn the iris ring on the lens to adjust the iris manually. Memo : ● Even during Manual Iris mode, the camera recorder enters forced Auto Iris mode while the [IRIS AUTO] button is pressed. Auto Iris (Automatic Adjustment) Mode Set the [IRIS] switch on the lens to AAB to enter Auto Iris mode. The iris is automatically adjusted according to the brightness of the object. Memo : ● Even when the [IRIS] switch of the lens is set to AMB, it switches automatically to Auto Iris mode when the [FULL AUTO] switch is set to AONB. ● When [Iris Control] in the [Camera Function] B [FULL AUTO] menu is set to AOffB, you can adjust the iris manually even if the [FULL AUTO] switch on the camera recorder is set to AONB. (A Page 81) ● You can use the cross-shaped button (H I) on this camera recorder to set the target level (brighter/darker) of the auto iris. You can also use the menu to set the tracking sensitivity of the auto iris. (A Page 78) 39
-
 1
1 -
2
-
3
-
4
-
5
-
6
-
7
-
8
-
9
-
10
-
11
-
12
-
13
-
14
-
15
-
16
-
17
-
18
-
19
-
20
-
21
-
22
-
23
-
24
-
25
-
26
-
27
-
28
-
29
-
30
-
31
-
32
-
33
-
34
-
35
-
36
-
37
-
38
-
39
-
 40
40 -
 41
41 -
 42
42 -
 43
43 -
 44
44 -
 45
45 -
 46
46 -
 47
47 -
 48
48 -
 49
49 -
 50
50 -
51
-
52
-
53
-
54
-
55
-
56
-
57
-
58
-
59
-
60
-
61
-
62
-
63
-
64
-
65
-
66
-
67
-
68
-
69
-
70
-
71
-
72
-
73
-
74
-
75
-
76
-
77
-
78
-
79
-
80
-
81
-
82
-
83
-
84
-
85
-
86
-
87
-
88
-
89
-
90
-
91
-
92
-
93
-
94
-
95
-
96
-
97
-
98
-
99
-
100
-
101
-
102
-
103
-
104
-
105
-
106
-
107
-
108
-
109
-
110
-
111
-
112
-
113
-
114
-
115
-
116
-
117
-
118
-
119
-
120
-
121
-
122
-
123
-
124
-
125
-
126
-
127
-
128
-
129
-
130
-
131
-
132
-
133
-
134
-
135
-
136
-
137
-
138
-
139
-
140
-
141
 |
 |
