Jensen VM9022HDN Operation Manual - Page 10
Installing the MediaLink External AV, Connector, Installing the Navigation Antenna
 |
UPC - 043258304322
View all Jensen VM9022HDN manuals
Add to My Manuals
Save this manual to your list of manuals |
Page 10 highlights
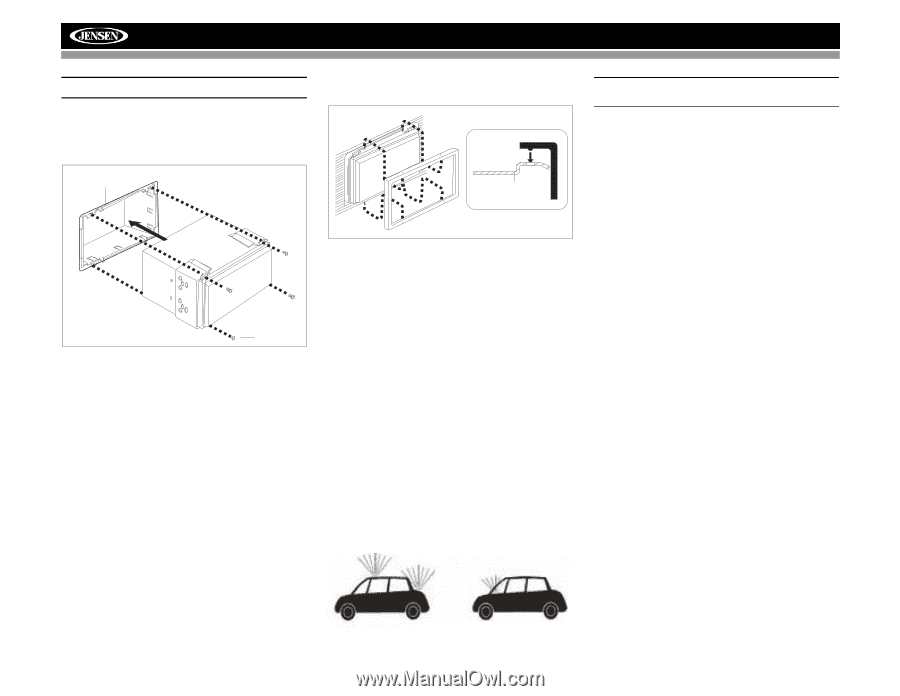
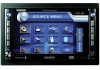
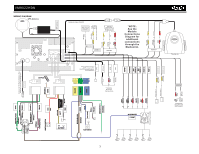
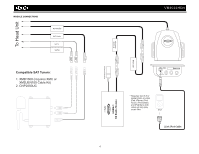
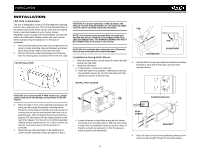
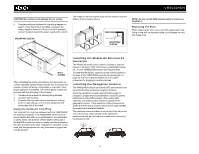
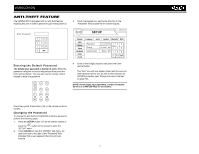
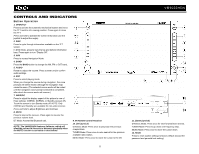
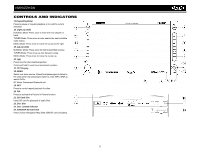
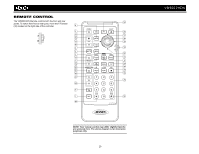
VM9022HDN CAUTION! Be careful not to damage the car wiring. 5. Complete wiring as illustrated in the wiring diagram on page 3. Once the wiring is complete, reconnect the battery negative terminal. If there is no ACC available, connect the ACC lead to the power supply with a switch. The 4 tabs on the trim ring will snap into four holes on top and bottom of the mounting sleeve. TRIM RING MOUNTING SLEEVE OPTIONAL MTORUIMNTRIINNGG SLEEVE NOTE: Do not cut the GPS antenna cable to shorten or lengthen it. Replacing the Fuse When replacing the fuse, use a new 20A replacement fuse. Using a fuse with an improper rating could damage the unit and cause a fire. M3x4 SCREW After completing the wiring connections, turn the unit on to confirm operation (ignition switch must be on). If unit does not operate, recheck all wiring until problem is corrected. Once proper operation is achieved, turn off the ignition switch and proceed with final mounting of the chassis. 1. Connect wiring adapter to existing wiring harness. 2. Connect antenna lead. 3. Carefully slide the radio into the half-sleeve, making sure it is right-side-up, until it is fully seated and the spring clips lock it into place. Using the Cosmetic Trim Ring Two cosmetic trim rings are packaged with the VM9022HDN for installation flexibility. The VM9022HDN will fit into most import dashes with little or no modification to the dashboard or cavity. Some US domestic vehicle dashes will accept a Double-DIN chassis, but there is usually a small gap between the radio and dash piece after installation is complete. In this case, use the appropriate trim ring to conceal any gaps that may be present. Installing the MediaLink External AV Connector The MediaLink allows you to connect a variety of external devices, including a VCR, DVD player, portable MP3 player, etc., to your VM9022HDN without removing the radio. To install the MediaLink, connect it to the AUX-IN cables on the back of the VM9022HDN (see the Wiring Diagram on page 3), and then install the MediaLink in a location convenient for plugging in auxiliary devices. Installing the Navigation Antenna The VM9022HDN utilizes an external GPS antenna that must be installed before accessing navigation features. Since the navigation module uses GPS technology for navigation, proper antenna placement is crucial for optimal performance of the GPS receiver. When using GPS antennas, the antenna plane should be parallel to the geographic horizon. There should be nothing between the antenna and the sky to ensure a direct line-of-sight between the antenna and available satellites. The preferred antenna location is on the top of the car on the roof or trunk area. When placed on the dashboard, performance may be reduced due to obstruction caused by the window or roof. 6
-
 1
1 -
2
-
3
-
4
-
 5
5 -
 6
6 -
 7
7 -
 8
8 -
 9
9 -
 10
10 -
 11
11 -
 12
12 -
 13
13 -
 14
14 -
 15
15 -
16
-
17
-
18
-
19
-
20
-
21
-
22
-
23
-
24
-
25
-
26
-
27
-
28
-
29
-
30
-
31
-
32
-
33
-
34
-
35
-
36
-
37
-
38
-
39
-
40
-
41
-
42
-
43
-
44
-
45
-
46
-
47
-
48
-
49
-
50
-
51
-
52
-
53
-
54
-
55
-
56
-
57
-
58
-
59
-
60
-
61
-
62
-
63
-
64
 |
 |