Kenmore 8027 Use and Care Guide - Page 15
Warning
 |
UPC - 719192272088
View all Kenmore 8027 manuals
Add to My Manuals
Save this manual to your list of manuals |
Page 15 highlights
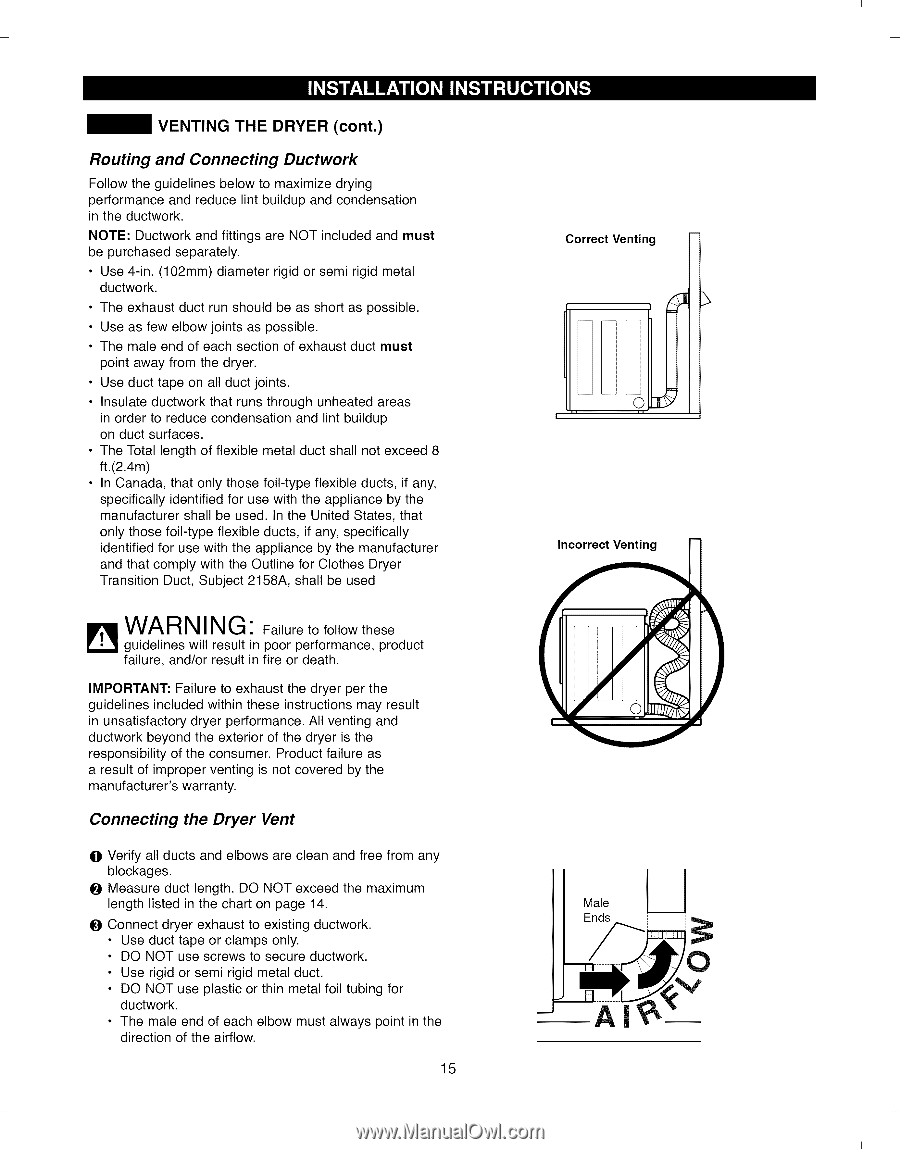
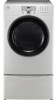
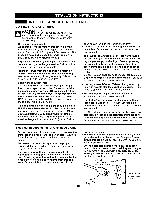
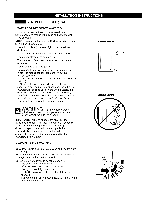
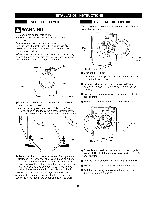
I I VENTING THE DRYER (cont.) Routing and Connecting Ductwork Follow the guidelines below to maximize drying performance and reduce lint buildup and condensation in the ductwork. NOTE: Ductwork and fittings are NOT included and must be purchased separately. • Use 4-in. (102mm) diameter rigid or semi rigid metal ductwork. • The exhaust duct run should be as short as possible. • Use as few elbow joints as possible. • The male end of each section of exhaust duct must point away from the dryer. • Use duct tape on all duct joints. • Insulate ductwork that runs through unheated areas in order to reduce condensation and lint buildup on duct surfaces. • The Total length of flexible metal duct shall not exceed 8 ft.(2.4m) • In Canada, that only those foil-type flexible ducts, if any, specifically identified for use with the appliance by the manufacturer shall be used. In the United States, that only those foil-type flexible ducts, if any, specifically identified for use with the appliance by the manufacturer and that comply with the Outline for Clothes Dryer Transition Duct, Subject 2158A, shall be used guidelines will result in poor performance, product failure, and/or result in fire or death. WARNING" Failure to follow these IMPORTANT: Failure to exhaust the dryer per the guidelines included within these instructions may result in unsatisfactory dryer performance. All venting and ductwork beyond the exterior of the dryer is the responsibility of the consumer. Product failure as a result of improper venting is not covered by the manufacturer's warranty. Connecting the Dryer Vent O Verify all ducts and elbows are clean and free from any O Measure duct length. DO NOT exceed the maximum bleloncgkthagleisst.ed in the chart on page 14. O Connect dryer exhaust to existing ductwork, • Use duct tape or clamps only. • DO NOT use screws to secure ductwork. • Use rigid or semi rigid metal duct. • DO NOT use plastic or thin metal foil tubing for ductwork. • The male end of each elbow must always point in the direction of the airflow. 15 Correct Venting Incorrect Venting 1 ( 7' Male ! i O I I
-
 1
1 -
2
-
3
-
4
-
5
-
6
-
7
-
8
-
9
-
 10
10 -
 11
11 -
 12
12 -
 13
13 -
 14
14 -
 15
15 -
 16
16 -
 17
17 -
 18
18 -
 19
19 -
 20
20 -
21
-
22
-
23
-
24
-
25
-
26
-
27
-
28
-
29
-
30
-
31
-
32
-
33
-
34
-
35
-
36
-
37
-
38
-
39
-
40
-
41
-
42
-
43
-
44
-
45
-
46
-
47
-
48
-
49
-
50
-
51
-
52
-
53
-
54
-
55
-
56
-
57
-
58
-
59
-
60
-
61
-
62
-
63
-
64
 |
 |