Kenmore 8027 Use and Care Guide - Page 29
Jwarning
 |
UPC - 719192272088
View all Kenmore 8027 manuals
Add to My Manuals
Save this manual to your list of manuals |
Page 29 highlights
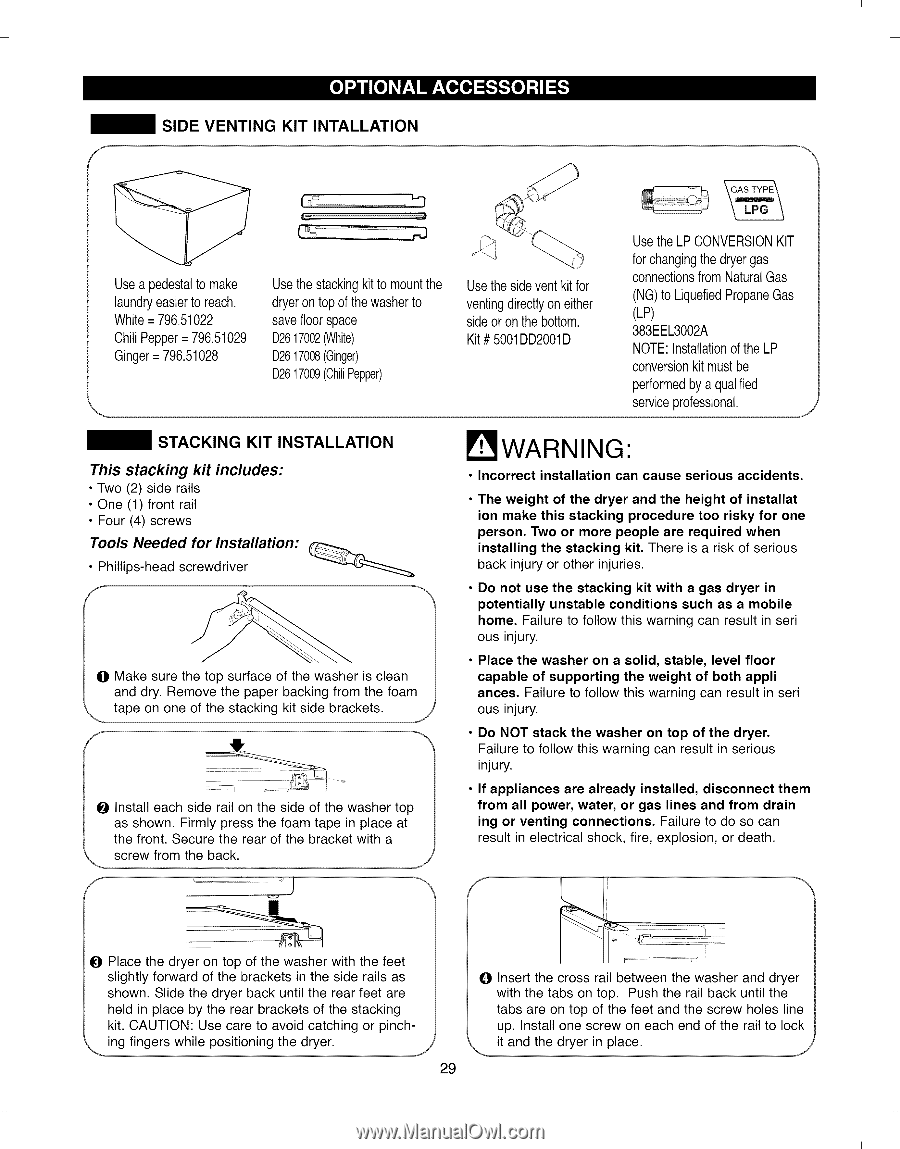
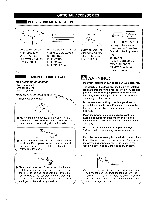
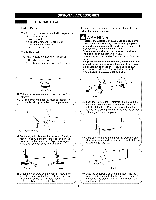
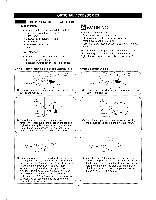
I I SIDE VENTING KIT INTALLATION "'3 C Use a pedestalto make laundryeasier to reach. White = 796.51022 Chili Pepper = 796.51029 Ginger = 796.51028 Use the stacking kit to mount the dryer on top of the washer to save floor space D2617002(White) D2617008(Ginger) D2617009(ChilPi epper) Use the side vent kit for venting directlyon either side or on the bottom. Kit # 5001DD2001D Use the LP CONVERSIONKIT for changingthe dryer gas connections from Natural Gas (NG)to LiquefiedPropane Gas (LP) 383EEL3002A NOTE: Installationof the LP conversion kit must be performedby a qualified service professional. STACKING KIT INSTALLATION This stacking kit includes: • Two (2) side rails • One (1) front rail • Four (4) screws Tools Needed for Installation: • Phillips-head screwdriver O Make sure the top surface of the washer is clean and dry. Remove the paper backing from the foam tape on one of the stacking kit side brackets. \ / O Install each side rail on the side of the washer top as shown. Firmly press the foam tape in place at the front. Secure the rear of the bracket with a screw from the back. ,,, j J WARNING" • Incorrect installation can cause serious accidents. The weight of the dryer and the height of installat ion make this stacking procedure too risky for one person. Two or more people are required when installing the stacking kit. There is a risk of serious back injury or other injuries. Do not use the stacking kit with a gas dryer in potentially unstable conditions such as a mobile home. Failure to follow this warning can result in seri ous injury. Place the washer on a solid, stable, level floor capable of supporting the weight of both appli ances. Failure to follow this warning can result in seri ous injury. Do NOT stack the washer on top of the dryer. Failure to follow this warning can result in serious injury. If appliances are already installed, disconnect them from all power, water, or gas lines and from drain ing or venting connections. Failure to do so can result in electrical shock, fire, explosion, or death. i O Place the dryer on top of the washer with the feet slightly forward of the brackets in the side rails as shown. Slide the dryer back until the rear feet are held in place by the rear brackets of the stacking kit. CAUTION: Use care to avoid catching or pinching fingers while positioning the dryer. ,i_::::--i_¸_--__:I O Insert the cross rail between the washer and dryer with the tabs on top. Push the rail back until the tabs are on top of the feet and the screw holes line up. Install one screw on each end of the rail to lock it and the dryer in place. 29 I I
-
 1
1 -
2
-
3
-
4
-
5
-
6
-
7
-
8
-
9
-
10
-
11
-
12
-
13
-
14
-
15
-
16
-
17
-
18
-
19
-
20
-
21
-
22
-
23
-
 24
24 -
 25
25 -
 26
26 -
 27
27 -
 28
28 -
 29
29 -
 30
30 -
 31
31 -
 32
32 -
 33
33 -
 34
34 -
35
-
36
-
37
-
38
-
39
-
40
-
41
-
42
-
43
-
44
-
45
-
46
-
47
-
48
-
49
-
50
-
51
-
52
-
53
-
54
-
55
-
56
-
57
-
58
-
59
-
60
-
61
-
62
-
63
-
64
 |
 |