Kenmore 8027 Use and Care Guide - Page 23
Modifier, Buttons
 |
UPC - 719192272088
View all Kenmore 8027 manuals
Add to My Manuals
Save this manual to your list of manuals |
Page 23 highlights
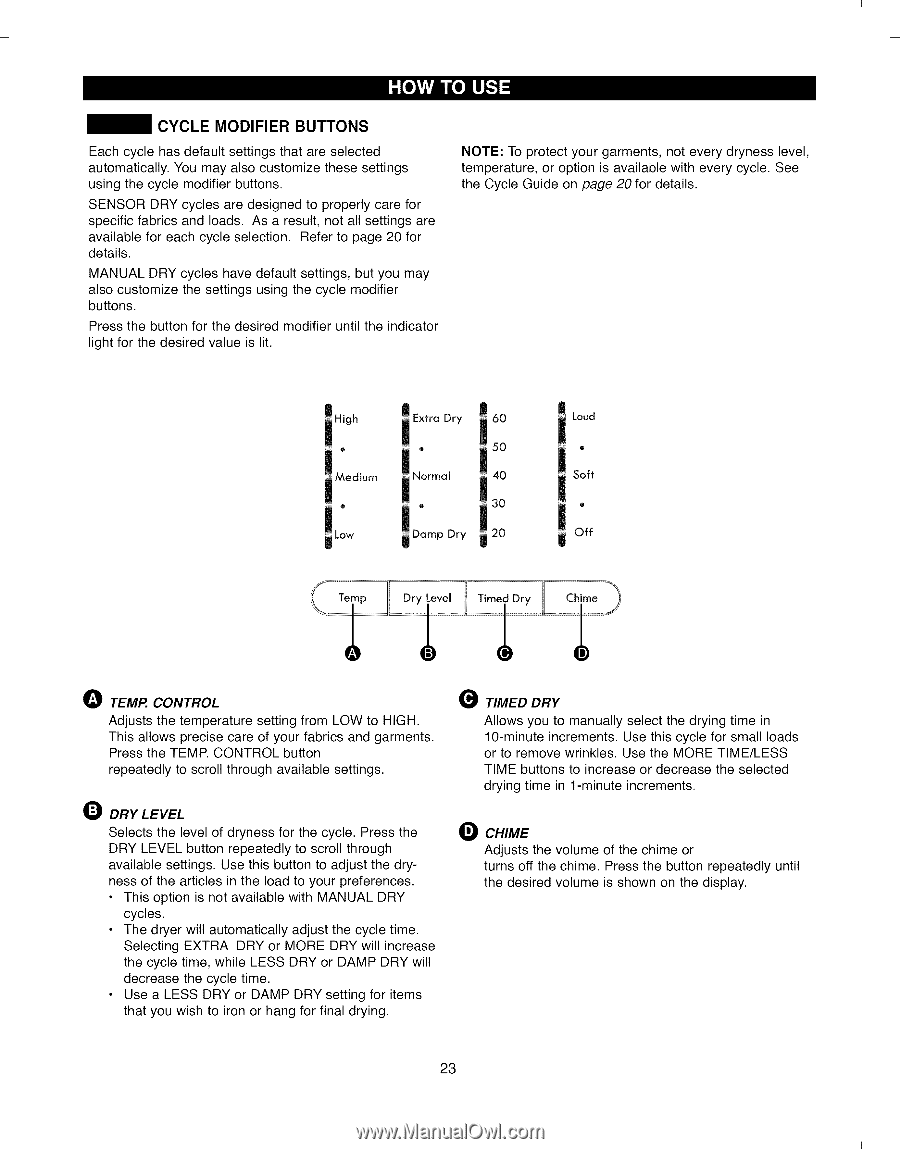
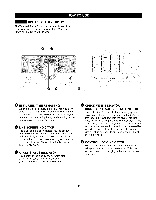
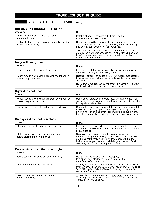
I I CYCLE MODIFIER BUTTONS Each cycle has default settings that are selected automatically. You may also customize these settings using the cycle modifier buttons. SENSOR DRY cycles are designed to properly care for specific fabrics and loads. As a result, not all settings are available for each cycle selection. Refer to page 20 for details. MANUAL DRY cycles have default settings, but you may also customize the settings using the cycle modifier buttons. Press the button for the desired modifier until the indicator light for the desired value is lit. NOTE: To protect your garments, not every dryness level, temperature, or option is available with every cycle. See the Cycle Guide on page 20 for details. High o Medium e Low Extra Dry 60 e 50 Normal 40 ® Damp Dry 320 _ Loud !" i Soft i.......O*ff 0 TEMP. CONTROL Adjusts the temperature setting from LOW to HIGH. This allows precise care of your fabrics and garments. Press the TEMR CONTROL button repeatedly to scroll through available settings. O DRY LEVEL Selects the level of dryness for the cycle. Press the DRY LEVEL button repeatedly to scroll through available settings. Use this button to adjust the dryness of the articles in the load to your preferences. • This option is not available with MANUAL DRY cycles. • The dryer will automatically adjust the cycle time. Selecting EXTRA DRY or MORE DRY will increase the cycle time, while LESS DRY or DAMP DRY will decrease the cycle time. • Use a LESS DRY or DAMP DRY setting for items that you wish to iron or hang for final drying. TIMED DRY Allows you to manually select the drying time in 10-minute increments. Use this cycle for small loads or to remove wrinkles. Use the MORE TIME/LESS TIME buttons to increase or decrease the selected drying time in 1-minute increments. O CHIME Adjusts the volume of the chime or turns off the chime. Press the button repeatedly until the desired volume is shown on the display. 23 I I
-
 1
1 -
2
-
3
-
4
-
5
-
6
-
7
-
8
-
9
-
10
-
11
-
12
-
13
-
14
-
15
-
16
-
17
-
 18
18 -
 19
19 -
 20
20 -
 21
21 -
 22
22 -
 23
23 -
 24
24 -
 25
25 -
 26
26 -
 27
27 -
 28
28 -
29
-
30
-
31
-
32
-
33
-
34
-
35
-
36
-
37
-
38
-
39
-
40
-
41
-
42
-
43
-
44
-
45
-
46
-
47
-
48
-
49
-
50
-
51
-
52
-
53
-
54
-
55
-
56
-
57
-
58
-
59
-
60
-
61
-
62
-
63
-
64
 |
 |