KitchenAid KFP715WH Use & Care Guide - Page 12
Citrus Press Assembly and Use
 |
UPC - 883049047423
View all KitchenAid KFP715WH manuals
Add to My Manuals
Save this manual to your list of manuals |
Page 12 highlights
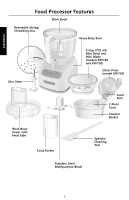
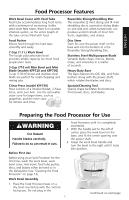
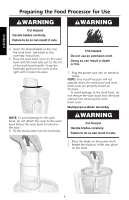
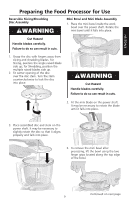
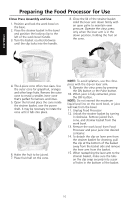
Preparing the Food Processor for Use Citrus Press Assembly and Use 1. Position and lock the work bowl on the base. 2. Place the strainer basket in the bowl and position the locking clip to the left of the work bowl handle. 3. Turn the basket counterclockwise until the clip locks into the handle. 8. Close the lid of the strainer basket. Hold the lever arm down firmly with an open palm to maintain even pressure. Operate the citrus press only when the lever arm is in the down position, holding the fruit on the cone. ENGLISH 4. The 2-piece cone offers two sizes. Use the outer cone for grapefruit, oranges and other large fruits. Remove the outer cone to reveal a smaller, inner cone that's perfect for lemons and limes. 5. Open the lid and place the cone inside the strainer basket, over the power shaft. It may be necessary to rotate the cone until it falls into place. 6. Halve the fruit to be juiced. 7. Place fruit half on the cone. NOTE: To avoid splatters, use the citrus press with the clip-on lever arm. 9. Operate the citrus press by pressing the ON button or the Pulse button. 10. When juice is fully extracted, press the OFF button. NOTE: Do not exceed the maximum liquid level line on the work bowl, or juice will leak from the bowl. 11. Unplug Food Processor 12. Unlock the strainer basket by turning it clockwise. Remove juiced fruit, cone, and strainer basket from the work bowl. 13. Remove the work bowl from Food Processor and pour juice into desired container. 14. To detach the clip-on lever arm from the strainer basket for cleaning, pull the clip at the bottom of the basket away from the basket side and remove the lever arm from the basket. 15. When reattaching the lever arm to the strainer basket, make sure the tabs on the clip snap securely into a pair of holes in the bottom of the basket. 10
-
 1
1 -
2
-
3
-
4
-
5
-
6
-
 7
7 -
 8
8 -
 9
9 -
 10
10 -
 11
11 -
 12
12 -
 13
13 -
 14
14 -
 15
15 -
 16
16 -
 17
17 -
18
-
19
-
20
-
21
-
22
-
23
-
24
-
25
-
26
-
27
-
28
-
29
-
30
-
31
-
32
-
33
-
34
-
35
-
36
-
37
-
38
-
39
-
40
-
41
-
42
-
43
-
44
-
45
-
46
-
47
-
48
-
49
-
50
-
51
-
52
-
53
-
54
-
55
-
56
-
57
-
58
-
59
-
60
-
61
-
62
-
63
-
64
-
65
-
66
-
67
-
68
-
69
-
70
-
71
-
72
-
73
-
74
-
75
-
76
-
77
-
78
-
79
-
80
-
81
-
82
-
83
 |
 |
