KitchenAid KRFC704FSS Use & Care Guide - Page 6
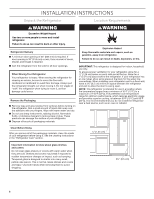
Getting Started - installation
 |
View all KitchenAid KRFC704FSS manuals
Add to My Manuals
Save this manual to your list of manuals |
Page 6 highlights
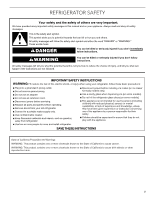
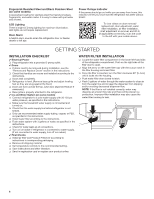
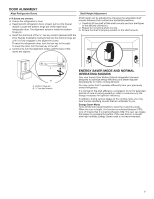
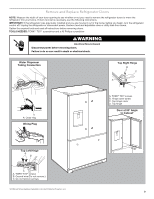
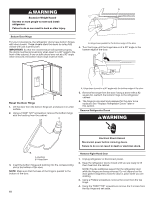
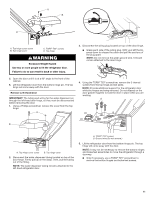
Fingerprint-Resistant Steel and Black Stainless Steel (on some models) A specialized coating for stainless steel that resists smudges, fingerprints, and water marks. It is easy to clean with just water and a towel. LED Lighting There is bright LED strip lighting for maximum illumination. LED lights do not require replacement. Door Alarm A helpful alarm sounds when the refrigerator door or freezer drawer is left ajar. Power Outage Indicator If the power should go out while you are away from home, this indicator will let you know that the refrigerator has been without power. To view videos on door removal/ replacement, door adjustment, water filter installation, air filter installation, shelf adjustment or removal, and Wi-Fi (if applicable) connectivity, scan the code to the left with your mobile device. GETTING STARTED INSTALLATION CHECKLIST ✔ Electrical Power ❑❑ Plug refrigerator into a grounded 3 prong outlet. ✔ Doors ❑❑ If doors need to be removed during installation, see the "Remove and Replace Doors" section in the instructions. ❑❑ Check that handles are secure and installed according to the instructions. ❑❑ Doors seal completely. ❑❑ Refrigerator is level. (Remove base grille and adjust leveling feet so they are snug against the floor.) ❑❑ Doors are even across the top. (Use door alignment feature if necessary.) ❑❑ Base grille is properly attached to the refrigerator. ✔ Ice and Water System (on some models) ❑❑ Connect refrigerator to a cold water supply with 20-120 psi water pressure, as specified in the instructions. ❑❑ Make sure the household water supply is connected and turned on. ❑❑ Check that the water supply line behind refrigerator is not kinked. ❑❑ Only use recommended water supply tubing, copper, or PEX, as specified in the instructions. ❑❑ Install water filter according to the instructions. ❑❑ Flush water system with 3 gallons of water, as specified in the instructions. ❑❑ Check for water leaks at all connections. ❑❑ Turn on ice maker if refrigerator is connected to water supply. (If not connected to water supply, turn off ice maker.) ✔ Final Checks ❑❑ Install air filter and Produce Preserver according to instructions in corresponding packaging. ❑❑ Remove all shipping material. ❑❑ Set temperature controls to the recommended setting. ❑❑ Save instructions and other literature. ❑❑ Send in registration card or register your product online. WATER FILTER INSTALLATION ❑❑ Locate the water filter compartment in the lower left-hand side of the refrigerator compartment. Push on the right side of the filter door to open. ❑❑ Align the arrow on the water filter cap with the cutout notch in the filter housing and insert filter. ❑❑ Once the filter is inserted, turn the filter clockwise 90° (¼ turn) until it locks into the housing. ❑❑ Push water filter door closed to latch. ❑❑ Flush 3 gallons of water through the water system to clear air from the water line and to keep the dispenser from dripping and/or avoiding decreased dispenser flow. NOTE: If the filter is not installed correctly, water may dispense at a lower flow rate and there will be slower ice production. Improper filter installation may also cause the water filter housing to leak. 6
-
 1
1 -
 2
2 -
 3
3 -
 4
4 -
 5
5 -
 6
6 -
 7
7 -
 8
8 -
 9
9 -
 10
10 -
 11
11 -
 12
12 -
13
-
14
-
15
-
16
-
17
-
18
-
19
-
20
-
21
-
22
-
23
-
24
-
25
-
26
-
27
-
28
-
29
-
30
-
31
-
32
-
33
-
34
-
35
-
36
-
37
-
38
-
39
-
40
-
41
-
42
-
43
-
44
-
45
-
46
-
47
-
48
-
49
-
50
-
51
-
52
-
53
-
54
-
55
-
56
-
57
-
58
-
59
-
60
-
61
-
62
-
63
-
64
-
65
-
66
-
67
-
68
-
69
-
70
-
71
-
72
-
73
-
74
-
75
-
76
-
77
-
78
-
79
-
80
-
81
-
82
-
83
-
84
-
85
-
86
-
87
-
88
-
89
-
90
-
91
-
92
-
93
-
94
-
95
-
96
-
97
-
98
-
99
-
100
-
101
-
102
-
103
-
104
-
105
-
106
-
107
-
108
-
109
-
110
-
111
-
112
-
113
-
114
-
115
-
116
 |
 |