Kodak 6850 User Manual - Page 37
Cleaning the Platen Roller, Maintaining the Printer, November 2011
 |
View all Kodak 6850 manuals
Add to My Manuals
Save this manual to your list of manuals |
Page 37 highlights
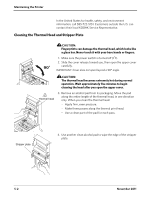
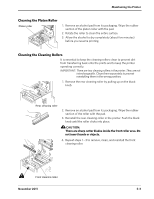
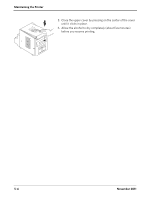
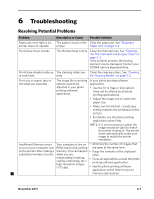
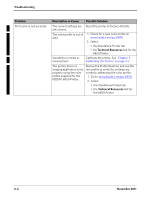
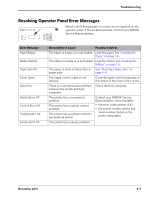
Maintaining the Printer Cleaning the Platen Roller Platen roller 1. Remove an alcohol pad from its packaging. Wipe the rubber section of the platen roller with the pad. 2. Rotate the roller to clean the entire surface. 3. Allow the alcohol to dry completely (about five minutes) before you resume printing. Cleaning the Cleaning Rollers It is essential to keep the cleaning rollers clean to prevent dirt from transferring back onto the prints and to keep the printer operating correctly. IMPORTANT: There are two cleaning rollers in the printer. They are not interchangeable. Clean them separately to prevent reinstalling them in the wrong position. 1. Remove the rear cleaning roller by pulling up on the black knob. Rear cleaning roller 2. Remove an alcohol pad from its packaging. Wipe the rubber section of the roller with the pad. 3. Reinstall the rear cleaning roller in the printer. Push the black knob until the roller clicks into place. CAUTION: There are sharp cutter blades inside the front roller area. Do not insert hands or objects. 4. Repeat steps 1 - 3 to remove, clean, and reinstall the front cleaning roller. Front cleaning roller November 2011 5-3
-
 1
1 -
2
-
3
-
4
-
5
-
6
-
7
-
8
-
9
-
10
-
11
-
12
-
13
-
14
-
15
-
16
-
17
-
18
-
19
-
20
-
21
-
22
-
23
-
24
-
25
-
26
-
27
-
28
-
29
-
30
-
31
-
 32
32 -
 33
33 -
 34
34 -
 35
35 -
 36
36 -
 37
37 -
 38
38 -
 39
39 -
 40
40 -
 41
41 -
 42
42 -
43
-
44
-
45
-
46
-
47
-
48
 |
 |
