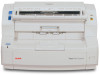
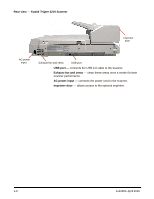
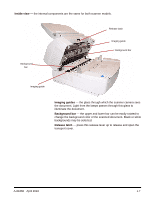
Konica Minolta Kodak Truper 3610 User Guide - Page 16
Installing the software, Step 1: User Utility, User Utility, ISIS/TWAIN Driver, VirtualReScan
 |
View all Konica Minolta Kodak Truper 3610 manuals
Add to My Manuals
Save this manual to your list of manuals |
Page 16 highlights
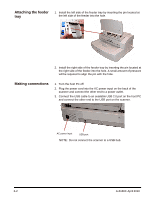
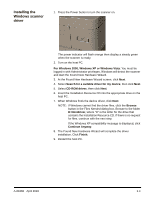
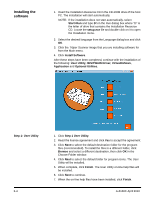
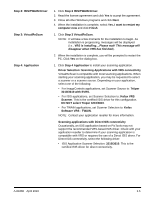
Installing the software 1. Insert the Installation Resource CD in the CD-ROM drive of the host PC. The installation will start automatically. NOTE: If the installation does not start automatically, select Start>Run and type D:\ in the Run dialog box where "D" is the letter of drive that contains the Installation Resource CD. Locate the setup.exe file and double-click on it to open the Installation menu. 2. Select the desired language from the Language dialog box and click OK. 3. Click the Trūper Scanner image that you are installing software for from the Main menu. 4. Click Install Software. After these steps have been completed, continue with the installation of the following: User Utility, ISIS/TWAIN Driver, VirtualReScan, Application and Optional Utilities. Step 1: User Utility 2-4 1. Click Step 1 User Utility. 2. Read the license agreement and click Yes to accept the agreement. 3. Click Next to select the default destination folder for the program files (recommended). To install the files in a different folder, click Browse and select a different destination, then click OK in the Choose Folder window. 4. Click Next to select the default folder for program icons. The User Utility will be installed. 5. When complete, click Finish. The User Utility on-line help files will be installed. 6. Click Next to continue. 7. When the on-line help files have been installed, click Finish. A-61660 April 2010
-
 1
1 -
2
-
3
-
4
-
5
-
6
-
7
-
8
-
9
-
10
-
 11
11 -
 12
12 -
 13
13 -
 14
14 -
 15
15 -
 16
16 -
 17
17 -
 18
18 -
 19
19 -
 20
20 -
 21
21 -
22
-
23
-
24
-
25
-
26
-
27
-
28
-
29
-
30
-
31
-
32
-
33
-
34
-
35
-
36
-
37
-
38
-
39
-
40
-
41
-
42
-
43
-
44
-
45
-
46
-
47
-
48
-
49
-
50
-
51
-
52
-
53
-
54
-
55
-
56
-
57
-
58
-
59
-
60
-
61
-
62
-
63
-
64
-
65
-
66
-
67
-
68
-
69
-
70
-
71
-
72
-
73
-
74
-
75
-
76
-
77
-
78
-
79
-
80
-
81
-
82
-
83
 |
 |
