Konica Minolta bizhub 160 bizhub 160 User Guide - Page 42
Display Indications
 |
View all Konica Minolta bizhub 160 manuals
Add to My Manuals
Save this manual to your list of manuals |
Page 42 highlights
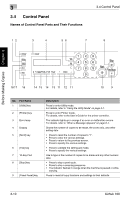
Before Making Copies Chapter 3 Ö 3.4 Control Panel No. Part Name 10 [Start] key 11 [L] [M] key 12 [Zoom] key 13 [Paper] key 14 [ ] [Ö ] key 15 [Auto/Photo] key 16 [Sort] key 17 [2in1] key 18 [Status] key Display Indications 1 3 Description • Press to start a scanning or print cycle. • Press to specify the various settings. • The indicator lights up in green when the machine can accept copy jobs. • Press to change the zoom ratio in the range between × 0.25 and × 4.00 in × 0.01 increments. • Press to scan through the various settings and information, in order. • Press to specify the various settings. Press to select a zoom ratio from among those fixed ratios available as standard. Press to select the paper tray that contains the desired paper. • Press to adjust the image density. • Press to specify the various settings. Press to change the image density mode. Press to select the sort function. Press to select the 2in1 function. Press to display each Counter value. (p. 3-30) 2 3 [A] 4 5 No. Display Indication 1 Document type 2 Zoom ratio 3 Number of copies 4 Image density 5 Paper Description Displays the document type currently specified for the image density. Displays the currently specified zoom ratio. Displays the currently specified number of copy pages and number of copy sets. Displays the currently specified image density. Displays the currently selected paper tray, paper size and paper type. bizhub 160 3-11
-
 1
1 -
2
-
3
-
4
-
5
-
6
-
7
-
8
-
9
-
10
-
11
-
12
-
13
-
14
-
15
-
16
-
17
-
18
-
19
-
20
-
21
-
22
-
23
-
24
-
25
-
26
-
27
-
28
-
29
-
30
-
31
-
32
-
33
-
34
-
35
-
36
-
 37
37 -
 38
38 -
 39
39 -
 40
40 -
 41
41 -
 42
42 -
 43
43 -
 44
44 -
 45
45 -
 46
46 -
 47
47 -
48
-
49
-
50
-
51
-
52
-
53
-
54
-
55
-
56
-
57
-
58
-
59
-
60
-
61
-
62
-
63
-
64
-
65
-
66
-
67
-
68
-
69
-
70
-
71
-
72
-
73
-
74
-
75
-
76
-
77
-
78
-
79
-
80
-
81
-
82
-
83
-
84
-
85
-
86
-
87
-
88
-
89
-
90
-
91
-
92
-
93
-
94
-
95
-
96
-
97
-
98
-
99
-
100
-
101
-
102
-
103
-
104
-
105
-
106
-
107
-
108
-
109
-
110
-
111
-
112
-
113
-
114
-
115
-
116
-
117
-
118
-
119
-
120
-
121
-
122
-
123
-
124
-
125
-
126
-
127
-
128
-
129
-
130
-
131
-
132
-
133
-
134
-
135
-
136
-
137
-
138
-
139
-
140
-
141
-
142
-
143
-
144
-
145
-
146
-
147
-
148
-
149
-
150
 |
 |
