Konica Minolta bizhub 36 bizhub 36/42 Print Operations User Guide - Page 107
Quick Setting-Details of the [Custom] setting - toner
 |
View all Konica Minolta bizhub 36 manuals
Add to My Manuals
Save this manual to your list of manuals |
Page 107 highlights
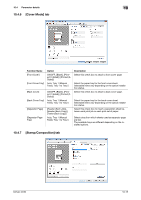
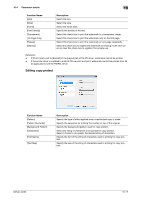
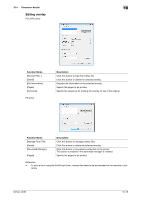
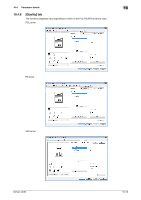
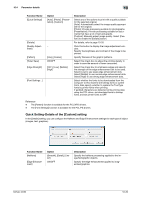
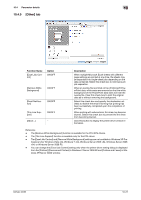
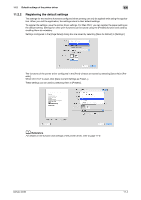
10.4 Parameter details 10 Function Name [Quick Settings] [Details] [Quality Adjustment] [Pattern] [Toner Save] [Edge Strength] [Font Settings...] Option [Auto], [Photo], [Presentation], [Custom] − − [Fine], [Coarse] ON/OFF [OFF], [Low], [Middle], [High] − Description Select any of the options to print with a quality suitable for the selected original. [Auto]: Automatically select the image quality appropriate for the original. [Photo]: Provide processing suitable for photographs. [Presentation]: Provide processing suitable for documents that have a lot of text and graphs. [Custom]: Manually adjust image quality. Select [Custom] to enable the [Details] button. For details, refer to page 10-20. Click this button to display the image adjustment window. Specify the brightness and contrast of the image to be printed. Specify fineness of the graphic patterns. Select this check box to adjust the printing density in order to save the amount of toner consumed. Select this check box to emphasize edges and specify the strength of the edge enhancement dot to be used. Select [Low] to use weak edge enhancement dots. Select [Middle] to use normal edge enhancement dots. Select [High] to use strong edge enhancement dots. Select whether the fonts to be downloaded from the computer to this machine are bitmap fonts or outline fonts. Also specify whether to replace the TrueType fonts by printer fonts when printing. If garbled characters are detected while printing data using the PCL driver, set download fonts to bitmap fonts, and set printer fonts to OFF. Reference - The [Pattern] function is available for the PCL/XPS drivers. - The [Font Settings] function is available for the PCL/PS drivers. Quick Setting-Details of the [Custom] setting In the [Details] setting, you can configure the Halftone and Edge Enhancement settings for each type of object (images, text, graphics). Function Name [Halftone] [Edge Enhancement] Option [Smooth], [Detail], [Line Art] ON/OFF Description Specify the halftone processing applied to the image/text/graphic objects. Specify the edge enhancement applied to images/text/graphics. bizhub 42/36 10-20
-
 1
1 -
2
-
3
-
4
-
5
-
6
-
7
-
8
-
9
-
10
-
11
-
12
-
13
-
14
-
15
-
16
-
17
-
18
-
19
-
20
-
21
-
22
-
23
-
24
-
25
-
26
-
27
-
28
-
29
-
30
-
31
-
32
-
33
-
34
-
35
-
36
-
37
-
38
-
39
-
40
-
41
-
42
-
43
-
44
-
45
-
46
-
47
-
48
-
49
-
50
-
51
-
52
-
53
-
54
-
55
-
56
-
57
-
58
-
59
-
60
-
61
-
62
-
63
-
64
-
65
-
66
-
67
-
68
-
69
-
70
-
71
-
72
-
73
-
74
-
75
-
76
-
77
-
78
-
79
-
80
-
81
-
82
-
83
-
84
-
85
-
86
-
87
-
88
-
89
-
90
-
91
-
92
-
93
-
94
-
95
-
96
-
97
-
98
-
99
-
100
-
101
-
 102
102 -
 103
103 -
 104
104 -
 105
105 -
 106
106 -
 107
107 -
 108
108 -
 109
109 -
 110
110 -
 111
111 -
 112
112 -
113
-
114
-
115
-
116
-
117
-
118
-
119
-
120
-
121
-
122
-
123
-
124
-
125
-
126
-
127
-
128
-
129
-
130
-
131
-
132
-
133
-
134
-
135
-
136
-
137
-
138
-
139
-
140
-
141
-
142
-
143
-
144
-
145
-
146
-
147
-
148
-
149
-
150
-
151
-
152
-
153
-
154
-
155
-
156
-
157
-
158
-
159
-
160
-
161
-
162
-
163
-
164
-
165
-
166
-
167
-
168
-
169
-
170
-
171
-
172
-
173
-
174
-
175
-
176
-
177
-
178
-
179
-
180
-
181
-
182
-
183
-
184
-
185
-
186
-
187
-
188
-
189
-
190
-
191
-
192
-
193
-
194
-
195
-
196
-
197
-
198
 |
 |