Konica Minolta bizhub 36 bizhub 36/42 Print Operations User Guide - Page 143
Printing a document on the machine for which Account Track function is enabled
 |
View all Konica Minolta bizhub 36 manuals
Add to My Manuals
Save this manual to your list of manuals |
Page 143 highlights
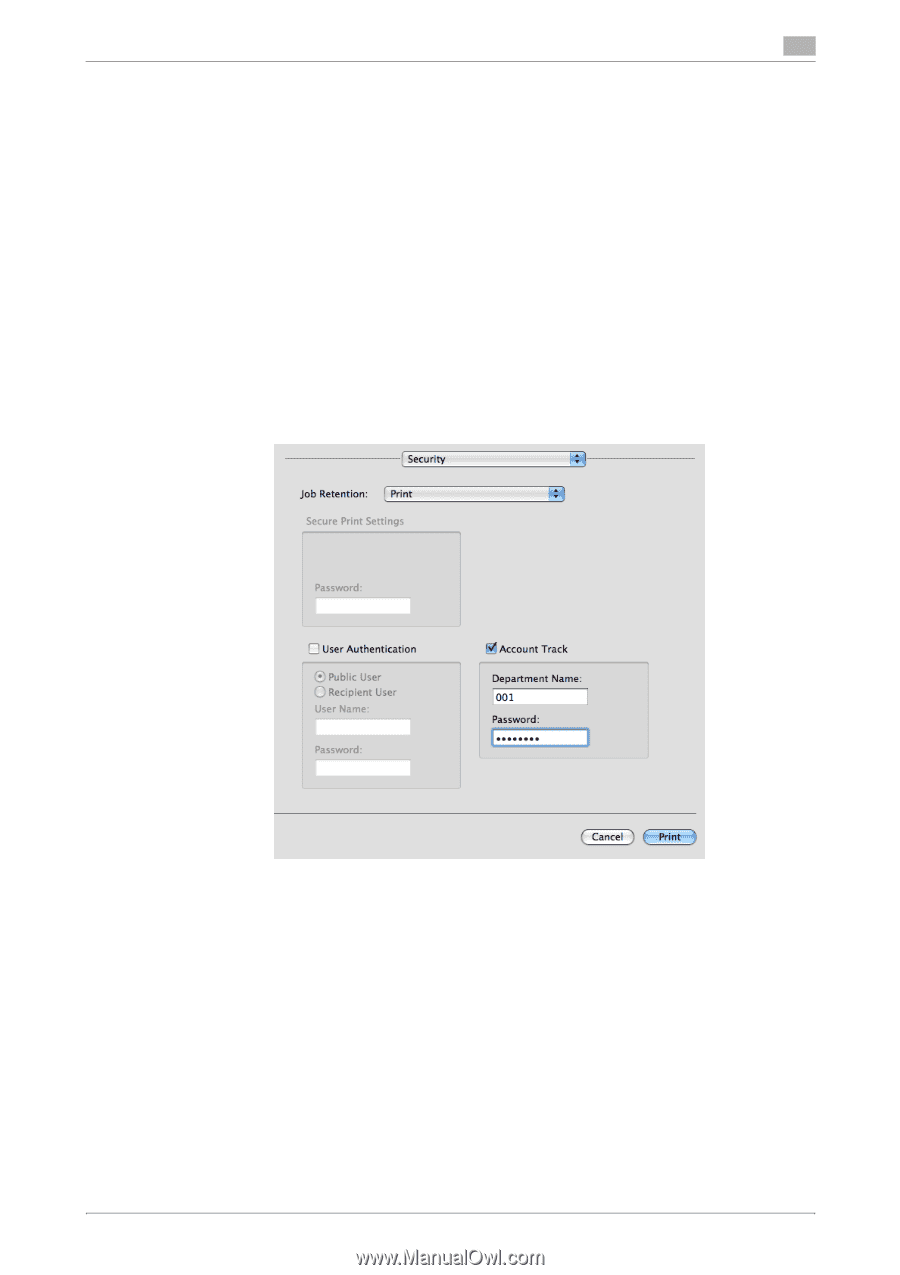
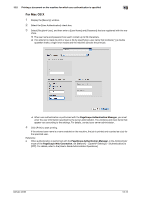
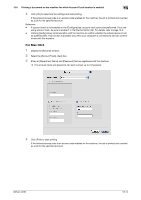
13.6 Printing a document on the machine for which Account Track function is enabled 13 4 Click [OK] to determine the settings and start printing. If the entered access code is an access code enabled on the machine, the job is printed and counted as a job for the specified account. Reference - If account track is not enabled on the [Configure] tab, account track cannot be performed. If you are using account track, be sure to enable it in the [Device Option] list. For details, refer to page 10-4. - Clicking [Verify] allows communication with the machine to confirm whether the entered account can be authenticated. This function is available only when your computer is connected to and can communicate with this machine. For Mac OS X 1 Display the [Security] window. 2 Select the [Account Track] check box. 3 Enter an [Department Name] and [Password] that are registered with the machine. % The account name and password can each contain up to 8 characters. 4 Click [Print] to start printing. If the entered access code is an access code enabled on the machine, the job is printed and counted as a job for the specified account. bizhub 42/36 13-14
-
 1
1 -
2
-
3
-
4
-
5
-
6
-
7
-
8
-
9
-
10
-
11
-
12
-
13
-
14
-
15
-
16
-
17
-
18
-
19
-
20
-
21
-
22
-
23
-
24
-
25
-
26
-
27
-
28
-
29
-
30
-
31
-
32
-
33
-
34
-
35
-
36
-
37
-
38
-
39
-
40
-
41
-
42
-
43
-
44
-
45
-
46
-
47
-
48
-
49
-
50
-
51
-
52
-
53
-
54
-
55
-
56
-
57
-
58
-
59
-
60
-
61
-
62
-
63
-
64
-
65
-
66
-
67
-
68
-
69
-
70
-
71
-
72
-
73
-
74
-
75
-
76
-
77
-
78
-
79
-
80
-
81
-
82
-
83
-
84
-
85
-
86
-
87
-
88
-
89
-
90
-
91
-
92
-
93
-
94
-
95
-
96
-
97
-
98
-
99
-
100
-
101
-
102
-
103
-
104
-
105
-
106
-
107
-
108
-
109
-
110
-
111
-
112
-
113
-
114
-
115
-
116
-
117
-
118
-
119
-
120
-
121
-
122
-
123
-
124
-
125
-
126
-
127
-
128
-
129
-
130
-
131
-
132
-
133
-
134
-
135
-
136
-
137
-
 138
138 -
 139
139 -
 140
140 -
 141
141 -
 142
142 -
 143
143 -
 144
144 -
 145
145 -
 146
146 -
 147
147 -
 148
148 -
149
-
150
-
151
-
152
-
153
-
154
-
155
-
156
-
157
-
158
-
159
-
160
-
161
-
162
-
163
-
164
-
165
-
166
-
167
-
168
-
169
-
170
-
171
-
172
-
173
-
174
-
175
-
176
-
177
-
178
-
179
-
180
-
181
-
182
-
183
-
184
-
185
-
186
-
187
-
188
-
189
-
190
-
191
-
192
-
193
-
194
-
195
-
196
-
197
-
198
 |
 |