Kyocera TASKalfa 620 Scan System (H) Operation Guide (Setup Edition) - Page 25
Performing the Required Operation at the Scanner, Press [Common] or [Private],
 |
View all Kyocera TASKalfa 620 manuals
Add to My Manuals
Save this manual to your list of manuals |
Page 25 highlights
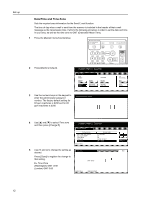
Performing the Required Operation at the Scanner 3 Select your user name. Press the me. number key directly or enter the user number using the numeric keys and press [Enter]. Stop User number (with #key) Enter Note If the Selec. of senders (users) setting is turned ON, the user that is registered under User Number 001 will be automatically selected. If a password was designated during registration of your user information, the Password Input screen will appear. After entering the appropriate password, press [Enter]. If the entered password matches the registered one, the appropriate screen will appear. Password Clear (Enter by #key) Stop Enter 4 Press [Save at user PC] if you want to save the scanned data in a user's computer. The registered user names will be displayed in the Destination field. Ready to scan. Place the original and select destinatio.n Scan to PC-Continuous TX D e sti n ati o n Save at User PC Ad d re ss Book D e l e te Auto O ri g i n al Size Auto size Sending Size Basi c O ri g i A4 0 Single Scan Top Edge Top O ri g i n al O ri e n t. 300dpi Scan Re so l u ti o n Q u al i ty 5 If you want to enter an e-mail address using a personal Address Book or the shared Address Book, press [Address Book]. Ready to scan. Place the original and select destinatio.n Scan to PC-Continuous TX Destination Group A Group B User A Save at User PC Address Book Delete Auto Original Size Auto size Sending Size Basic Original A4 10/1 Single Scan Top Edge Top Original Orient. 300dpi Scan Resolution Quality 6 Press [Common] or [Private], as appropriate. The destinations registered Address Book in that Address Book will be displayed. The following gives an example of selecting a destination from the shared Address Book. Use [] and [] to select the desired Symbol 0-9 ABC DEF GHI JKL MNO PQR STU VWX YZ Address Group A Group B User A User B User C Select: Up A P Down E destination and then press [Add]. Common Private The number of selected destinations appears to the right of Select. Also, appears to the right of the selected destination. Note If the Address Book software is not running, the personal Address Book will not be displayed. 17
-
 1
1 -
2
-
3
-
4
-
5
-
6
-
7
-
8
-
9
-
10
-
11
-
12
-
13
-
14
-
15
-
16
-
17
-
18
-
19
-
 20
20 -
 21
21 -
 22
22 -
 23
23 -
 24
24 -
 25
25 -
 26
26 -
 27
27 -
 28
28 -
 29
29 -
 30
30 -
31
-
32
-
33
-
34
-
35
-
36
-
37
-
38
-
39
-
40
-
41
-
42
-
43
-
44
 |
 |
