LG CU920 Owner's Manual - Page 82
After you've taken your photo - black
 |
UPC - 562174053454
View all LG CU920 manuals
Add to My Manuals
Save this manual to your list of manuals |
Page 82 highlights
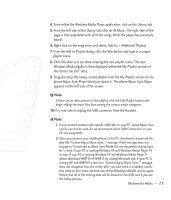
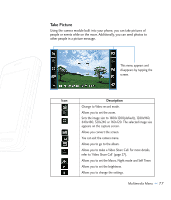
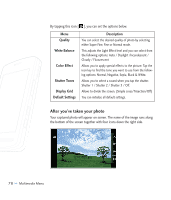
By tapping this icon [ ], you can set the options below. Menu Quality White Balance Color Effect Shutter Tones Display Grid Default Settings Description You can select the desired quality of photo by selecting either Super Fine, Fine or Normal mode. This adjusts the Light Effect level and you can select from the following options: Auto / Daylight /Incandescent / Cloudy / Fluourescent Allows you to apply special effects to the picture. Tap the icon key to find the tone you want to use from the following options: Normal, Negative, Sepia, Black & White. Allows you to select a sound when you tap the shutter. Shutter 1 / Shutter 2 / Shutter 3 / Off. Allows to divide the screen. (Simple cross/Trisection/Off) You can initialize all default settings. After you've taken your photo Your captured photo will appear on screen. The name of the image runs along the bottom of the screen together with four icons down the right side. 78 >> Multimedia Menu
-
 1
1 -
2
-
3
-
4
-
5
-
6
-
7
-
8
-
9
-
10
-
11
-
12
-
13
-
14
-
15
-
16
-
17
-
18
-
19
-
20
-
21
-
22
-
23
-
24
-
25
-
26
-
27
-
28
-
29
-
30
-
31
-
32
-
33
-
34
-
35
-
36
-
37
-
38
-
39
-
40
-
41
-
42
-
43
-
44
-
45
-
46
-
47
-
48
-
49
-
50
-
51
-
52
-
53
-
54
-
55
-
56
-
57
-
58
-
59
-
60
-
61
-
62
-
63
-
64
-
65
-
66
-
67
-
68
-
69
-
70
-
71
-
72
-
73
-
74
-
75
-
76
-
 77
77 -
 78
78 -
 79
79 -
 80
80 -
 81
81 -
 82
82 -
 83
83 -
 84
84 -
 85
85 -
 86
86 -
 87
87 -
88
-
89
-
90
-
91
-
92
-
93
-
94
-
95
-
96
-
97
-
98
-
99
-
100
-
101
-
102
-
103
-
104
-
105
-
106
-
107
-
108
-
109
-
110
-
111
-
112
-
113
-
114
-
115
-
116
-
117
-
118
-
119
-
120
-
121
-
122
-
123
-
124
-
125
-
126
-
127
-
128
-
129
-
130
-
131
-
132
-
133
-
134
-
135
-
136
-
137
-
138
-
139
-
140
-
141
-
142
-
143
 |
 |
