Lantronix MatchPort b/g MatchPort b/g - User Guide - Page 21
Automatic IP Address Configuration, MatchPort b/g
 |
View all Lantronix MatchPort b/g manuals
Add to My Manuals
Save this manual to your list of manuals |
Page 21 highlights
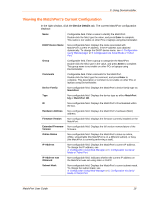
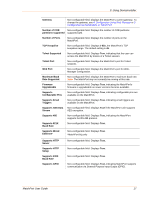
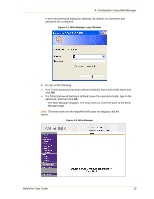
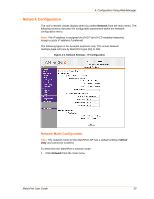
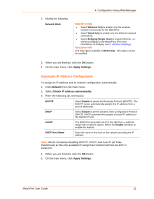
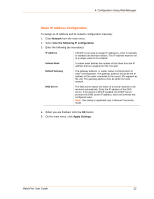
2. Modify the following: Network Mode 4: Configuration Using Web-Manager MatchPort b/g • Select Wireless Only to enable only the wireless network connectivity for the MatchPort. • Select Wired Only to enable only the Ethernet network connectivity. • Select Bridging (Single Host) to enable Ethernet -to- wireless bridging on the MatchPort. (For more information on bridging, see 9: Wireless Bridging.) MatchPort NR The only option available is Wired Only. This option cannot be modified. 3. When you are finished, click the OK button. 4. On the main menu, click Apply Settings. Automatic IP Address Configuration To assign an IP address and its network configuration automatically: 1. Click Network from the main menu. 2. Select Obtain IP address automatically. 3. Enter the following (as necessary): BOOTP Select Enable to permit the Bootstrap Protocol (BOOTP). The BOOTP server automatically assigns the IP address from a pool of addresses. DHCP Select Enable to permit Dynamic Host Configuration Protocol (DHCP). DHCP automatically assigns a leased IP address to the MatchPort unit. AutoIP The MatchPort generates an IP in the 169.254.x.x address range with a Class B subnet. Select the Enable checkbox to enable this feature. DHCP Host Name Enter the name of the host on the network providing the IP address. Note: We do not advise disabling BOOTP, DHCP, and Auto-IP (all three checkboxes) as the only available IP assignment method will then be ARP or serial port. 4. When you are finished, click the OK button. 5. On the main menu, click Apply Settings. MatchPort User Guide 21
-
 1
1 -
2
-
3
-
4
-
5
-
6
-
7
-
8
-
9
-
10
-
11
-
12
-
13
-
14
-
15
-
 16
16 -
 17
17 -
 18
18 -
 19
19 -
 20
20 -
 21
21 -
 22
22 -
 23
23 -
 24
24 -
 25
25 -
 26
26 -
27
-
28
-
29
-
30
-
31
-
32
-
33
-
34
-
35
-
36
-
37
-
38
-
39
-
40
-
41
-
42
-
43
-
44
-
45
-
46
-
47
-
48
-
49
-
50
-
51
-
52
-
53
-
54
-
55
-
56
-
57
-
58
-
59
-
60
-
61
-
62
-
63
-
64
-
65
-
66
-
67
-
68
-
69
-
70
-
71
-
72
-
73
-
74
-
75
-
76
-
77
-
78
-
79
-
80
-
81
-
82
-
83
-
84
-
85
-
86
-
87
-
88
-
89
-
90
 |
 |
