Lenovo B520 Lenovo IdeaCentre B520 Hardware Maintenance Manual - Page 58
Replacing the keyboard
 |
View all Lenovo B520 manuals
Add to My Manuals
Save this manual to your list of manuals |
Page 58 highlights
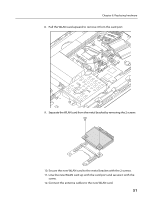
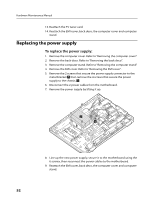
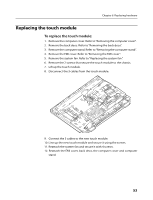
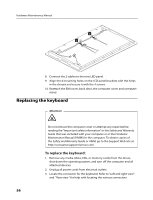
Hardware Maintenance Manual 8. Connect the 2 cables to the new LED panel. 9. Align the 4 mounting holes on the LED panel brackets with the holes in the chassis and secure it with the 4 screws. 10. Reattach the EMI cover, back deco, the computer cover and computer stand. Replacing the keyboard Attention Do not remove the computer cover or attempt any repair before reading the "Important safety information" in the Safety and Warranty Guide that was included with your computer or in the Hardware Maintenance Manual (HMM) for the computer. To obtain copies of the Safety and Warranty Guide or HMM, go to the Support Web site at: http://consumersupport.lenovo.com. To replace the keyboard: 1. Remove any media (disks, CDs, or memory cards) from the drives, shut down the operating system, and turn off the computer and all attached devices. 2. Unplug all power cords from electrical outlets. 3. Locate the connector for the keyboard. Refer to "Left and right view" and "Rear view " for help with locating the various connectors. 56
-
 1
1 -
2
-
3
-
4
-
5
-
6
-
7
-
8
-
9
-
10
-
11
-
12
-
13
-
14
-
15
-
16
-
17
-
18
-
19
-
20
-
21
-
22
-
23
-
24
-
25
-
26
-
27
-
28
-
29
-
30
-
31
-
32
-
33
-
34
-
35
-
36
-
37
-
38
-
39
-
40
-
41
-
42
-
43
-
44
-
45
-
46
-
47
-
48
-
49
-
50
-
51
-
52
-
 53
53 -
 54
54 -
 55
55 -
 56
56 -
 57
57 -
 58
58 -
 59
59 -
 60
60 -
 61
61 -
 62
62 -
 63
63 -
64
-
65
-
66
-
67
-
68
-
69
-
70
-
71
-
72
-
73
 |
 |
