Lenovo NetVista Hardware Maintenance Manual (HMM) for Aptiva and NetVista 2255 - Page 79
Mouse, Does The Mouse Move Smoothly And Keep X And Y Coordinates Changed? Yes, Read Ahead.
 |
View all Lenovo NetVista manuals
Add to My Manuals
Save this manual to your list of manuals |
Page 79 highlights
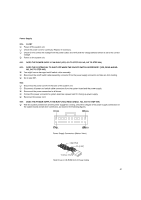
006 - DOES THE ERROR SYMPTOM STILL REMAIN? (YES, READ AHEAD. NO, GO TO STEP 007.) Replace the system board. End. 007 Replace the keyboard. End. Mouse NOTE: A sticking key button can cause the mouse to operate incorrectly. If you suspect this, go to "Keyboard" on page 78. 001 - START Make sure that the mouse ball turns freely. Make sure that the mouse plug connects properly. 002 Power off the system unit. Insert the diagnostics diskette into the diskette drive. Power on the system unit. Select Interactive Tests menu, then execute Mouse test. 003 - DO YOU SEE THE MOUSE CURSOR IN THE DIAGNOSTICS PROGRAM? (YES, READ AHEAD. NO, GO TO STEP 011) Test right (left) button and check if right (left) button works. 004 - DOES THE MOUSE BUTTON WORK? (YES, READ AHEAD. NO, GO TO STEP 007) Test mouse cursor movement. 005 - DOES THE MOUSE MOVE SMOOTHLY AND KEEP X AND Y COORDINATES CHANGED? (YES, READ AHEAD. NO, GO TO STEP 006) Mouse is functioning normally. End. 006 Power off the system unit. Open mouse bottom cover and clean track ball. Go to step 002. 007 Power off the system unit. Check the mouse plug. 008 - ARE THERE ANY BROKEN PINS IN THE MOUSE PLUG? (YES, GO TO STEP 010. NO, READ AHEAD.) Try with a known good mouse. 009 - DO THE ERROR SYMPTOMS STILL REMAIN? (YES, READ AHEAD. NO, GO TO STEP 010.) Replace the system board. End 79
-
 1
1 -
2
-
3
-
4
-
5
-
6
-
7
-
8
-
9
-
10
-
11
-
12
-
13
-
14
-
15
-
16
-
17
-
18
-
19
-
20
-
21
-
22
-
23
-
24
-
25
-
26
-
27
-
28
-
29
-
30
-
31
-
32
-
33
-
34
-
35
-
36
-
37
-
38
-
39
-
40
-
41
-
42
-
43
-
44
-
45
-
46
-
47
-
48
-
49
-
50
-
51
-
52
-
53
-
54
-
55
-
56
-
57
-
58
-
59
-
60
-
61
-
62
-
63
-
64
-
65
-
66
-
67
-
68
-
69
-
70
-
71
-
72
-
73
-
 74
74 -
 75
75 -
 76
76 -
 77
77 -
 78
78 -
 79
79 -
 80
80 -
 81
81 -
 82
82 -
 83
83 -
 84
84 -
85
-
86
-
87
-
88
-
89
-
90
-
91
-
92
-
93
-
94
-
95
-
96
-
97
-
98
-
99
-
100
-
101
-
102
-
103
-
104
-
105
-
106
-
107
-
108
-
109
-
110
-
111
-
112
-
113
-
114
-
115
-
116
-
117
-
118
-
119
-
120
-
121
-
122
-
123
-
124
-
125
-
126
-
127
-
128
-
129
-
130
-
131
-
132
-
133
-
134
-
135
-
136
-
137
-
138
-
139
-
140
-
141
-
142
-
143
-
144
-
145
-
146
-
147
-
148
-
149
-
150
-
151
-
152
-
153
-
154
-
155
 |
 |