Lenovo ThinkPad T550 (English) Hardware Maintenance Manual - ThinkPad T550, W5 - Page 82
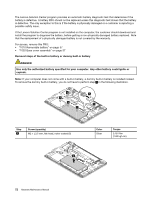
Smart card assembly or dummy smart card, Ensure that the connector is attached firmly.
 |
View all Lenovo ThinkPad T550 manuals
Add to My Manuals
Save this manual to your list of manuals |
Page 82 highlights
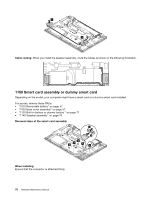
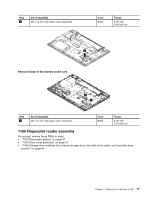
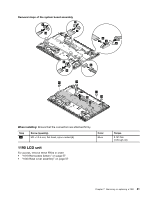
3 3 Cable routing: When you install the speaker assembly, route the cables as shown in the following illustration. 1150 Smart card assembly or dummy smart card Depending on the model, your computer might have a smart card or a dummy smart card installed. For access, remove these FRUs: • "1010 Removable battery" on page 57 • "1020 Base cover assembly" on page 57 • "1120 Built-in battery or dummy battery " on page 71 • "1140 Speaker assembly" on page 75 Removal steps of the smart card assembly 1 2 3 3 3 3 3 When installing: Ensure that the connector is attached firmly. 76 Hardware Maintenance Manual
-
 1
1 -
2
-
3
-
4
-
5
-
6
-
7
-
8
-
9
-
10
-
11
-
12
-
13
-
14
-
15
-
16
-
17
-
18
-
19
-
20
-
21
-
22
-
23
-
24
-
25
-
26
-
27
-
28
-
29
-
30
-
31
-
32
-
33
-
34
-
35
-
36
-
37
-
38
-
39
-
40
-
41
-
42
-
43
-
44
-
45
-
46
-
47
-
48
-
49
-
50
-
51
-
52
-
53
-
54
-
55
-
56
-
57
-
58
-
59
-
60
-
61
-
62
-
63
-
64
-
65
-
66
-
67
-
68
-
69
-
70
-
71
-
72
-
73
-
74
-
75
-
76
-
 77
77 -
 78
78 -
 79
79 -
 80
80 -
 81
81 -
 82
82 -
 83
83 -
 84
84 -
 85
85 -
 86
86 -
 87
87 -
88
-
89
-
90
-
91
-
92
-
93
-
94
-
95
-
96
-
97
-
98
-
99
-
100
-
101
-
102
-
103
-
104
-
105
-
106
-
107
-
108
-
109
-
110
-
111
-
112
 |
 |

3
3
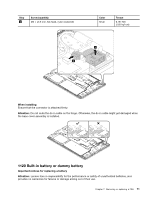
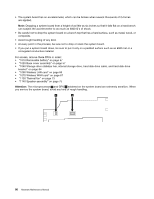
Cablerouting:
When you install the speaker assembly, route the cables as shown in the following illustration.
1150Smartcardassemblyordummysmartcard
Depending on the model, your computer might have a smart card or a dummy smart card installed.
For access, remove these FRUs:
• “1010 Removable battery” on page 57
• “1020 Base cover assembly” on page 57
• “1120 Built-in battery or dummy battery ” on page 71
• “1140 Speaker assembly” on page 75
Removal steps of the smart card assembly
2
1
3
3
3
3
3
Wheninstalling:
Ensure that the connector is attached firmly.
76
Hardware Maintenance Manual