Lenovo ThinkPad W540 (English) System Update 3.14 Deployment Guide - Page 33
Version control for System Update, String Value, RepositoryLocation2 - release
 |
View all Lenovo ThinkPad W540 manuals
Add to My Manuals
Save this manual to your list of manuals |
Page 33 highlights
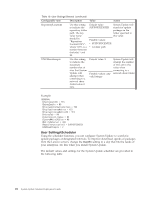
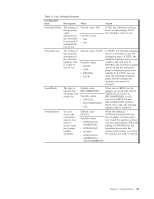
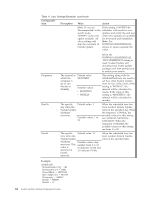
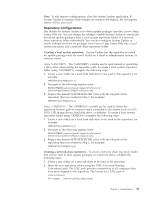
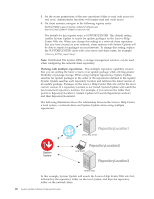
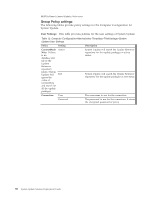
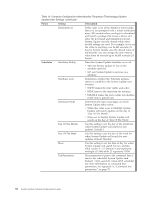
v RepositoryLocation1 - Lenovo Help Center Web site v RepositoryLocation2 - Local system v RepositoryLocation3 - Network share Creating and configuring multiple repositories with the registry: To create and configure multiple repository locations, complete the following steps: 1. Create a new folder on a local hard disk drive to be used as the repository, for example: %ANYDRV%\SystemUpdate3_x\ 2. Create a new folder on a network share to be used as the repository. 3. Share the new repository folder using the UNC path. The UNC path provides connectivity to all computers that have been mapped to the repository. The format for the System Update UNC path is: \\Server\Share\ For example: \\Server_X\TVSU_repository\ 4. Set the access permissions of the new repository folder to read only access for end users. Administrator functions will require read and write access. 5. Navigate to the following registry location: HKLM\SOFTWARE\Lenovo\System Update\Preferences\UserSettings\General\ Note: There will be a default key for the RepositoryLocation1 entry. 6. From the Registry Editor main menu, click Edit and then click New. 7. Scroll down and click String Value and then type RepositoryLocation2. 8. Repeat step 4 and create another string value and then type RepositoryLocation3. 9. Double-click the RepositoryLocation2 string. 10. Type the file path for your local system repository, for example: %ANYDRV%\SystemUpdate3_x\ 11. Double-click the RepositoryLocation3 string. 12. Type the network share repository path of your server and share, for example: \\Server_X\TVSU_repository\ Note: To edit registry configurations, close the System Update application. If System Update is running while changes are made in the registry, the old registry entries will be recovered. UNC: The user name and password used by System Update and Update Retriever to access a network shared should only be used by System Update and Update Retriever. If you map the repository location or log on to it using the same user name and password that is used by System Update or Update Retriever the MapDrv utility used to connect to the network share will not be able to access the network share repository. Should this occur, System Update and Update Retriever will fail in the attempt to access the network share repository. For more information, see "Using the MapDrv utility" on page 81. Version control for System Update When new releases of System Update are available, System Update connects to the Lenovo Help Center Web site, detects and downloads the new version, and then installs that version. This process is done automatically, without user interaction, but can be disabled. For information on disabling the upgrade, see "UC Settings\HTTPSHelloSettings configurable items" on page 16. Chapter 3. Configurations 27
-
 1
1 -
2
-
3
-
4
-
5
-
6
-
7
-
8
-
9
-
10
-
11
-
12
-
13
-
14
-
15
-
16
-
17
-
18
-
19
-
20
-
21
-
22
-
23
-
24
-
25
-
26
-
27
-
 28
28 -
 29
29 -
 30
30 -
 31
31 -
 32
32 -
 33
33 -
 34
34 -
 35
35 -
 36
36 -
 37
37 -
 38
38 -
39
-
40
-
41
-
42
-
43
-
44
-
45
-
46
-
47
-
48
-
49
-
50
-
51
-
52
-
53
-
54
-
55
-
56
-
57
-
58
-
59
-
60
-
61
-
62
-
63
-
64
-
65
-
66
-
67
-
68
-
69
-
70
-
71
-
72
-
73
-
74
-
75
-
76
-
77
-
78
-
79
-
80
-
81
-
82
-
83
-
84
-
85
-
86
-
87
-
88
-
89
-
90
-
91
-
92
 |
 |