Lexmark 260dn User's Guide - Page 110
Restricting access to printer menus, Setting up e-mail alerts, Settings, Security - drivers
 |
UPC - 734646056960
View all Lexmark 260dn manuals
Add to My Manuals
Save this manual to your list of manuals |
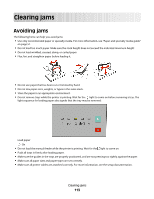
Page 110 highlights
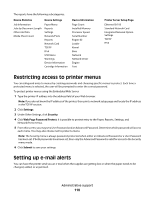
The reports have the following subcategories: Device Statistics Device Settings Job Information Jobs by Document Length Other Job Data Media Sheet Count Paper Menu Reports Settings Network/Ports Reports Network Card TCP/IP IPv6 USB Menu Warnings Device Information Cartridge Information Device Information Page Count Installed Memory Processor Speed Serial Number Engine ID Loader Kernel Base Network Network Driver Engine Font Printer Server Setup Page Ethernet10/100 Standard Network Card Integrated Network Option Settings TCP/IP IPv6 Restricting access to printer menus You can safeguard entry to menus by creating passwords and choosing specific menus to protect. Each time a protected menu is selected, the user will be prompted to enter the correct password. To protect printer menus using the Embedded Web Server: 1 Type the printer IP address into the address field of your Web browser. Note: If you do not know the IP address of the printer, then print a network setup page and locate the IP address in the TCP/IP section. 2 Click Settings. 3 Under Other Settings, click Security. 4 Click Web Page Password Protect. It is possible to protect entry to the Paper, Reports, Settings, and Network/Ports menus. 5 From this screen, you may set a User Password and an Advanced Password. Determine which password will access each menu. You may also choose not to protect a menu. Note: The Security menu is always password-protected when either an Advanced Password or a User Password has been set. If both passwords have been set, then only the Advanced Password is valid for access to the Security menu mode. 6 Click Submit to save your settings. Setting up e-mail alerts You can have the printer send you an e-mail when the supplies are getting low or when the paper needs to be changed, added, or unjammed. Administrative support 110
-
 1
1 -
2
-
3
-
4
-
5
-
6
-
7
-
8
-
9
-
10
-
11
-
12
-
13
-
14
-
15
-
16
-
17
-
18
-
19
-
20
-
21
-
22
-
23
-
24
-
25
-
26
-
27
-
28
-
29
-
30
-
31
-
32
-
33
-
34
-
35
-
36
-
37
-
38
-
39
-
40
-
41
-
42
-
43
-
44
-
45
-
46
-
47
-
48
-
49
-
50
-
51
-
52
-
53
-
54
-
55
-
56
-
57
-
58
-
59
-
60
-
61
-
62
-
63
-
64
-
65
-
66
-
67
-
68
-
69
-
70
-
71
-
72
-
73
-
74
-
75
-
76
-
77
-
78
-
79
-
80
-
81
-
82
-
83
-
84
-
85
-
86
-
87
-
88
-
89
-
90
-
91
-
92
-
93
-
94
-
95
-
96
-
97
-
98
-
99
-
100
-
101
-
102
-
103
-
104
-
 105
105 -
 106
106 -
 107
107 -
 108
108 -
 109
109 -
 110
110 -
 111
111 -
 112
112 -
 113
113 -
 114
114 -
 115
115 -
116
-
117
-
118
-
119
-
120
-
121
-
122
-
123
-
124
-
125
-
126
-
127
-
128
-
129
-
130
-
131
-
132
-
133
-
134
-
135
-
136
-
137
-
138
-
139
-
140
-
141
-
142
-
143
-
144
-
145
-
146
-
147
-
148
-
149
-
150
-
151
-
152
-
153
-
154
-
155
-
156
 |
 |