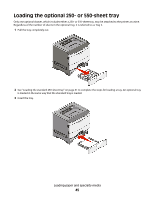
Lexmark 260dn User's Guide - Page 48
Linking and unlinking trays, Linking trays - network setup
 |
UPC - 734646056960
View all Lexmark 260dn manuals
Add to My Manuals
Save this manual to your list of manuals |
Page 48 highlights
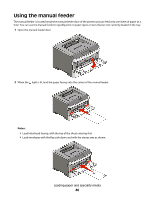
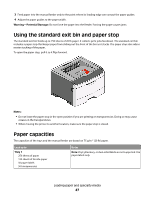
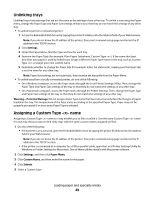
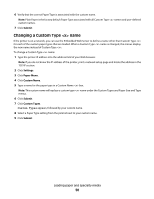
Load up to Tray 2 250 or 550 sheets of paper 50 paper labels Manual feeder 1 sheet of paper 1 sheet of A6-size paper 1 transparency 1 sheet of card stock 1 envelope Notes Notes: • Only one optional drawer may be installed on the printer at a time. The maximum amount of paper that can be loaded depends on whether you have an optional 250- or 550-sheet tray. • Vinyl, pharmacy, or dual-sided labels are not supported. Use paper labels only. Note: Feed paper into the manual feeder only to the point where its leading edge can contact the paper guides. Do not force the paper into the feeder. Linking and unlinking trays Linking trays Tray linking is useful for large print jobs or multiple copies. When one linked tray is empty, paper feeds from the next linked tray. When the Size and Type settings are the same for any trays, the trays are automatically linked. The Size and Type settings for all trays must be set from the Paper menu. To initiate tray linking from a networked printer, access the Embedded Web Server: 1 Type the printer IP address into the address field of your Web browser. Note: If you do not know the IP address of the printer, print a network setup page and locate the IP address in the TCP/IP section. 2 Click the Settings tab. 3 Under the Paper Menu, find the Size and Type for each tray. 4 Make sure the sizes and types of paper are the same under each tray to be linked. 5 Click Submit. To initiate tray linking from a locally connected printer: • On a Windows computer, access the Paper menu through the Local Printer Settings Utility. • On a Macintosh computer, access the Paper menu through the Printer Settings. Loading paper and specialty media 48
-
 1
1 -
2
-
3
-
4
-
5
-
6
-
7
-
8
-
9
-
10
-
11
-
12
-
13
-
14
-
15
-
16
-
17
-
18
-
19
-
20
-
21
-
22
-
23
-
24
-
25
-
26
-
27
-
28
-
29
-
30
-
31
-
32
-
33
-
34
-
35
-
36
-
37
-
38
-
39
-
40
-
41
-
42
-
 43
43 -
 44
44 -
 45
45 -
 46
46 -
 47
47 -
 48
48 -
 49
49 -
 50
50 -
 51
51 -
 52
52 -
 53
53 -
54
-
55
-
56
-
57
-
58
-
59
-
60
-
61
-
62
-
63
-
64
-
65
-
66
-
67
-
68
-
69
-
70
-
71
-
72
-
73
-
74
-
75
-
76
-
77
-
78
-
79
-
80
-
81
-
82
-
83
-
84
-
85
-
86
-
87
-
88
-
89
-
90
-
91
-
92
-
93
-
94
-
95
-
96
-
97
-
98
-
99
-
100
-
101
-
102
-
103
-
104
-
105
-
106
-
107
-
108
-
109
-
110
-
111
-
112
-
113
-
114
-
115
-
116
-
117
-
118
-
119
-
120
-
121
-
122
-
123
-
124
-
125
-
126
-
127
-
128
-
129
-
130
-
131
-
132
-
133
-
134
-
135
-
136
-
137
-
138
-
139
-
140
-
141
-
142
-
143
-
144
-
145
-
146
-
147
-
148
-
149
-
150
-
151
-
152
-
153
-
154
-
155
-
156
 |
 |