Lexmark C752 User Reference - Page 50
Confidential Job, Held Jobs, Print Buffer, Enter PIN, Print All Jobs, Delete All Jobs, Copies
 |
View all Lexmark C752 manuals
Add to My Manuals
Save this manual to your list of manuals |
Page 50 highlights
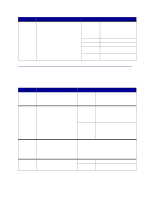
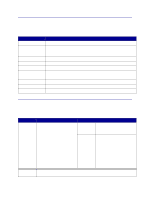
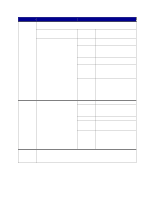
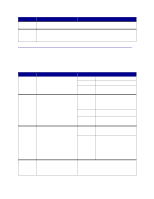
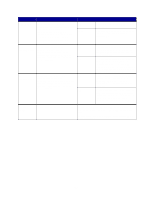
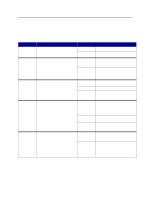
Menu Item Confidential Job Held Jobs Print Buffer Purpose Values To print confidential jobs stored in printer memory. Note: When the confidential job prints, it is automatically deleted from printer memory. 1 Enter the Personal Identification Enter PIN Number (PIN) associated with your confidential job. Use the operator panel buttons to enter the PIN associated with your confidential job. 2 Then select a value: Print All Jobs Prints all jobs associated with your PIN. Print A Job Prints the specified confidential job. Press Menu to scroll through the list of confidential jobs associated with your PIN. Press Select to print a specific job. Delete All Jobs Deletes all jobs associated with your PIN. Delete A Job Deletes the specified confidential job. Press Menu to scroll through the list of Confidential Jobs associated with your PIN. Press Select to delete a specific job. Copies Determines the number of copies printed for each confidential job. Press Menu to scroll through the list of confidential jobs associated with your PIN. Press Select to specify the job you want to print. Press Menu to increase or decrease the number of copies, and then press Select. To print Reserve Print, Repeat Print, or Print All Jobs Verify Print jobs stored in printer memory. Print A Job Prints all held jobs. Prints the specified held job. Press Menu to scroll through the list of held jobs. Press Select to print the specific job. Delete All Jobs Deletes all held jobs. Delete A Job Deletes the designated held job. Press Menu to scroll through the list of held jobs. Press Select to delete the job. Copies Determines the number of copies for each held job. Press Menu to scroll through the list of held jobs. Press Select to specify the job you want to print. Press Menu to increase or decrease the number of copies, and then press Select. To print any data stored in the print buffer. Note: Print Buffer is only available when you enter the Job Menu while Waiting is displayed. The Waiting state occurs if an incomplete job is sent to the printer or an ASCII job, such as a print screen command, is printing. 50
-
 1
1 -
2
-
3
-
4
-
5
-
6
-
7
-
8
-
9
-
10
-
11
-
12
-
13
-
14
-
15
-
16
-
17
-
18
-
19
-
20
-
21
-
22
-
23
-
24
-
25
-
26
-
27
-
28
-
29
-
30
-
31
-
32
-
33
-
34
-
35
-
36
-
37
-
38
-
39
-
40
-
41
-
42
-
43
-
44
-
 45
45 -
 46
46 -
 47
47 -
 48
48 -
 49
49 -
 50
50 -
 51
51 -
 52
52 -
 53
53 -
 54
54 -
 55
55 -
56
-
57
-
58
-
59
-
60
-
61
-
62
-
63
-
64
-
65
-
66
-
67
-
68
-
69
-
70
-
71
-
72
-
73
-
74
-
75
-
76
-
77
-
78
-
79
-
80
-
81
-
82
-
83
-
84
-
85
-
86
-
87
-
88
-
89
-
90
-
91
-
92
-
93
-
94
-
95
-
96
-
97
-
98
-
99
-
100
-
101
-
102
-
103
-
104
-
105
-
106
-
107
-
108
-
109
-
110
-
111
-
112
-
113
-
114
-
115
-
116
-
117
-
118
-
119
-
120
-
121
-
122
-
123
-
124
-
125
-
126
-
127
-
128
-
129
-
130
-
131
-
132
-
133
-
134
-
135
-
136
-
137
-
138
-
139
-
140
-
141
-
142
-
143
-
144
-
145
-
146
-
147
-
148
-
149
-
150
-
151
-
152
-
153
-
154
-
155
-
156
-
157
-
158
-
159
-
160
 |
 |
