Lexmark Pro205 User Guide - Page 79
Creating a contact list using the printer control panel, Sending faxes
 |
UPC - 734646275675
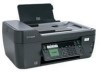
View all Lexmark Pro205 manuals
Add to My Manuals
Save this manual to your list of manuals |
Page 79 highlights
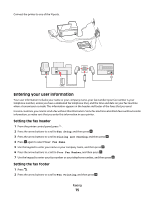
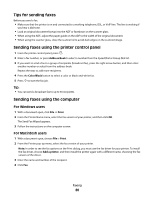
Creating a contact list using the printer control panel 1 From the printer control panel, press . 2 Press the arrow buttons to scroll to Fax Setup, and then press . 3 Press again to select Address Book. 4 To add a fax number to your Address Book: a Press the arrow buttons to scroll to Add Entry, and then press . b Use the keypad to enter the contact name in the Name field. c Press the down arrow button to move the cursor to the Number field. d Use the keypad to enter the fax number in the Number field, and then press to save the entry. e If you want to add another entry, press , and then repeat steps b through d. You can enter up to 89 fax numbers. 5 To add a fax group: a Press the arrow buttons to scroll to Add Group, and then press . b Use the keypad to enter a group name, and then press . c Press the arrow buttons to select whether you want to add a contact manually or import a contact. Press when you make a selection. • If you want to add a contact manually, then use the keypad to enter the fax number, and then press . • If you want to import a contact, then press the arrow buttons to select a contact from the Address Book or the Redial List. Press when you make a selection. d When you are finished adding contacts to the group, select Done. Sending faxes ADF Scanner glass WI F I PRINTING WI F I PRINTING Use the ADF for multiple-page documents. Note: The ADF is available only on selected models. If you purchased a printer without an ADF, then load original documents or photos on the scanner glass. Use the scanner glass for single pages, small items (such as postcards or photos), transparencies, photo paper, or thin media (such as magazine clippings). Faxing 79
-
 1
1 -
2
-
3
-
4
-
5
-
6
-
7
-
8
-
9
-
10
-
11
-
12
-
13
-
14
-
15
-
16
-
17
-
18
-
19
-
20
-
21
-
22
-
23
-
24
-
25
-
26
-
27
-
28
-
29
-
30
-
31
-
32
-
33
-
34
-
35
-
36
-
37
-
38
-
39
-
40
-
41
-
42
-
43
-
44
-
45
-
46
-
47
-
48
-
49
-
50
-
51
-
52
-
53
-
54
-
55
-
56
-
57
-
58
-
59
-
60
-
61
-
62
-
63
-
64
-
65
-
66
-
67
-
68
-
69
-
70
-
71
-
72
-
73
-
 74
74 -
 75
75 -
 76
76 -
 77
77 -
 78
78 -
 79
79 -
 80
80 -
 81
81 -
 82
82 -
 83
83 -
 84
84 -
85
-
86
-
87
-
88
-
89
-
90
-
91
-
92
-
93
-
94
-
95
-
96
-
97
-
98
-
99
-
100
-
101
-
102
-
103
-
104
-
105
-
106
-
107
-
108
-
109
-
110
-
111
-
112
-
113
-
114
-
115
-
116
-
117
-
118
-
119
-
120
-
121
-
122
-
123
-
124
-
125
-
126
-
127
-
128
-
129
-
130
-
131
-
132
-
133
-
134
-
135
-
136
-
137
-
138
-
139
-
140
-
141
-
142
-
143
-
144
-
145
-
146
-
147
-
148
-
149
-
150
-
151
-
152
-
153
-
154
-
155
-
156
-
157
-
158
-
159
-
160
-
161
-
162
-
163
-
164
-
165
-
166
-
167
-
168
-
169
-
170
-
171
-
172
-
173
-
174
-
175
-
176
-
177
 |
 |
