Lexmark S415 User's Guide - Page 21
Restoring factory default settings, Setup, Device Setup, Sleep, Screen Brightness
 |
View all Lexmark S415 manuals
Add to My Manuals
Save this manual to your list of manuals |
Page 21 highlights
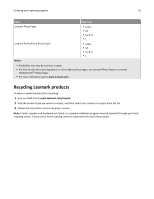
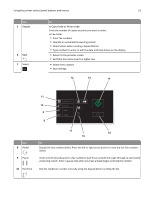
Using the printer control panel buttons and menus 21 To optimize energy efficiency, reduce the Sleep timeout and Screen Brightness: 1 From the printer control panel, navigate to: > Setup > OK > Device Setup > OK > Sleep > OK 2 Press the up or down arrow button to select or use the keypad to enter the Sleep timeout value, and then press . O K 3 From the printer control panel, navigate to: > Setup > OK > Device Setup > OK > Screen Brightness > OK 4 Press the up or down arrow button to scroll to Dim, and then press . OK Note: If you select 2‑Sided Copy, Standalone, then the printer prints on both sides of the paper (duplex) for copy and fax jobs, and for printing in Windows and Macintosh, depending on your printer model. Restoring factory default settings Resetting to factory default settings will delete all the printer settings you have previously selected. 1 From the printer control panel, navigate to: > Setup > OK > Restore Factory Defaults > OK 2 Press the up or down arrow button to scroll to Restore All Printer Settings, and then press . OK 3 Press the left or right arrow button to scroll to Yes, and then press . OK The printer restarts automatically after resetting to factory default settings. 4 When prompted to set the initial settings of your printer, make your selections using the printer control panel buttons. Initial Setup Complete appears on the display.
-
 1
1 -
2
-
3
-
4
-
5
-
6
-
7
-
8
-
9
-
10
-
11
-
12
-
13
-
14
-
15
-
 16
16 -
 17
17 -
 18
18 -
 19
19 -
 20
20 -
 21
21 -
 22
22 -
 23
23 -
 24
24 -
 25
25 -
 26
26 -
27
-
28
-
29
-
30
-
31
-
32
-
33
-
34
-
35
-
36
-
37
-
38
-
39
-
40
-
41
-
42
-
43
-
44
-
45
-
46
-
47
-
48
-
49
-
50
-
51
-
52
-
53
-
54
-
55
-
56
-
57
-
58
-
59
-
60
-
61
-
62
-
63
-
64
-
65
-
66
-
67
-
68
-
69
-
70
-
71
-
72
-
73
-
74
-
75
-
76
-
77
-
78
-
79
-
80
-
81
-
82
-
83
-
84
-
85
-
86
-
87
-
88
-
89
-
90
-
91
-
92
-
93
-
94
-
95
-
96
-
97
-
98
-
99
-
100
-
101
-
102
-
103
-
104
-
105
-
106
-
107
-
108
-
109
-
110
-
111
-
112
-
113
-
114
-
115
-
116
-
117
-
118
-
119
-
120
-
121
-
122
-
123
-
124
-
125
-
126
-
127
-
128
-
129
-
130
-
131
-
132
-
133
-
134
-
135
-
136
-
137
-
138
-
139
-
140
-
141
-
142
-
143
-
144
-
145
-
146
-
147
-
148
-
149
-
150
-
151
-
152
-
153
-
154
-
155
-
156
-
157
-
158
-
159
-
160
-
161
-
162
-
163
-
164
-
165
-
166
-
167
-
168
-
169
-
170
-
171
-
172
-
173
-
174
-
175
-
176
-
177
-
178
-
179
-
180
-
181
-
182
-
183
 |
 |