LiftMaster EL25 EL25-KEYPAD PROGRAMMING Manual - Page 31
Add or Edit Full Function Directory Code: 41, Change a Directory Code ONLY: 44
 |
View all LiftMaster EL25 manuals
Add to My Manuals
Save this manual to your list of manuals |
Page 31 highlights
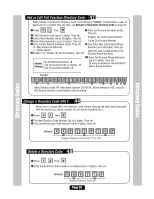
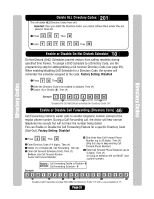
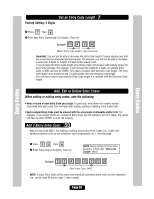
Add or Edit Full Function Directory Code: 41 When adding a full function Directory Code, it will default as "active". To deactivate a code, or deactivate on a specific time and date, see Activate or Deactivate Directory Code on page 32. 1 Press Then 7 Enter Call Forward Schedule (0-63). 2 Enter Directory Code (up to 2 digits). Then (#) 3 Enter Phone Number (up to 20 digits). Then (#) 4 Enter Phone Extension (up to 5 digits). Then (#) Then (#) 0=Never Use Call Forward Number 1=Use Call Forward Number 5 Enter Do Not Disturb Schedule (0-63). Then (#) 8 Only Enter New Call Forward Phone 0 = May always be disturbed Number (up to 20 digits). Then (#) 1 = Never disturb (Skip this step to keep existing Call 6 Enable (1) or Disable (0) Call Forwarding. Then (#) Forward Phone Number). Factory Settings Do Not Disturb Schedule = 0 Call Forwarding Enable or Disable = 0 Call Forwarding Schedule = 0 8A Enter Call Forward Phone Extension (up to 5 digits). Then (#) (If using an extension the unit MUST have a phone number). Example: 1 2 3 4 5 6 7 8 8A Adds Directory Code "45" with phone number "555-2134", phone extension "432", uses Do Not Disturb schedule 2 and disables call forwarding. Change a Directory Code ONLY: 44 Allows you to change ONLY the Directory Code without affecting the other data associated with the record (e.g., phone number, do not disturb schedule, etc.). 1 Press Then 2 The New Directory Code Number (Up to 4 digits). Then (#). 3 The Current Directory Code number (Up to 4 digits). Then (#). Example: 1 2 3 Changes Directory Code from "14" to "23". Directory Codes Directory Codes Delete a Directory Code: 48 1 Press Then 2 Enter the Directory Code number to be deleted (Up to 4 digits). Then (#) Example: 1 2 Deletes Directory Code "23". Page 30
-
 1
1 -
2
-
3
-
4
-
5
-
6
-
7
-
8
-
9
-
10
-
11
-
12
-
13
-
14
-
15
-
16
-
17
-
18
-
19
-
20
-
21
-
22
-
23
-
24
-
25
-
 26
26 -
 27
27 -
 28
28 -
 29
29 -
 30
30 -
 31
31 -
 32
32 -
 33
33 -
 34
34 -
 35
35 -
 36
36 -
37
-
38
-
39
-
40
-
41
-
42
-
43
-
44
-
45
-
46
-
47
-
48
-
49
-
50
-
51
-
52
-
53
-
54
-
55
-
56
-
57
-
58
-
59
-
60
-
61
-
62
-
63
-
64
-
65
-
66
-
67
-
68
-
69
-
70
-
71
-
72
-
73
-
74
-
75
-
76
-
77
-
78
-
79
-
80
 |
 |
