LiftMaster EL25 EL25-KEYPAD PROGRAMMING Manual - Page 67
Door Sensing Devices, Con the Alarm Features, Use Your Door Settings, Factory Setting
 |
View all LiftMaster EL25 manuals
Add to My Manuals
Save this manual to your list of manuals |
Page 67 highlights
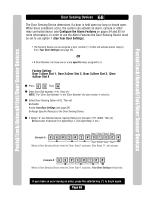
Postal/Lock/Autocall/Exit/Door Sensor Devices Postal/Lock/Autocall/Exit/Door Sensor Devices Door Sensing Devices 68 The Door Sensing Device determines if a door is held open too long or forced open. When these conditions occur, the system can activate an alarm, camera or other relay controlled device (see Configure the Alarm Features on pages 54 and 55 for more information). In order to use the Alarm Features the Door Sensing Device must be set to use option 1 (Use Your Door Settings). • The Sensing Device can be assigned a door number (1-4) that will activate preset relay(s) from Your Door Settings (see page 25). OR • A Door Number can have one or more specific relays assigned to it. Factory Setting: Door 1=Door Stat 1, Door 2=Door Stat 2, Door 3=Door Stat 3, |Door 4=Door Stat 4 1 Press Then 2 Enter Door Stat Number (1-4). Then (#) NOTE: The "Door Stat Number" is the "Door Number" the door sensor is wired to. 3 Select Door Sensing Option (0-2). Then (#) 0=Disable 1=Use Your Door Settings (see page 25). 2=Assign Specific Relay(s) to the Door Sensing Device. 4 If Option "2" was Selected above, Specify Relay(s) to Activate (1111-0000). Then (#) 0=Deactivate, 1=Activate (1st digit=Relay 4, 2nd digit=Relay 3, etc.) Relay 4 Relay 3 Relay 2 Relay 1 Example A : 1 2 3 Deact Activate Deact Deact 4 When a Door Sensing Device wired to "Door Stat 2" activates, Only Relay "3" will activate. Example B : 1 2 3 4 When a Door Sensing Device wired to "Door Stat 4" activates, Your Door Settings will activate. If you make an error during an entry, press the asterisk key (*) to begin again. Page 66
-
 1
1 -
2
-
3
-
4
-
5
-
6
-
7
-
8
-
9
-
10
-
11
-
12
-
13
-
14
-
15
-
16
-
17
-
18
-
19
-
20
-
21
-
22
-
23
-
24
-
25
-
26
-
27
-
28
-
29
-
30
-
31
-
32
-
33
-
34
-
35
-
36
-
37
-
38
-
39
-
40
-
41
-
42
-
43
-
44
-
45
-
46
-
47
-
48
-
49
-
50
-
51
-
52
-
53
-
54
-
55
-
56
-
57
-
58
-
59
-
60
-
61
-
 62
62 -
 63
63 -
 64
64 -
 65
65 -
 66
66 -
 67
67 -
 68
68 -
 69
69 -
 70
70 -
 71
71 -
 72
72 -
73
-
74
-
75
-
76
-
77
-
78
-
79
-
80
 |
 |
