LiftMaster EL25 EL25-KEYPAD PROGRAMMING Manual - Page 56
Con Door Forced Open” Alarm Feature: 103
 |
View all LiftMaster EL25 manuals
Add to My Manuals
Save this manual to your list of manuals |
Page 56 highlights
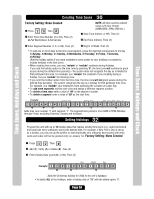
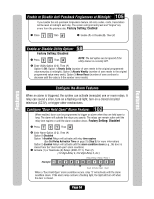
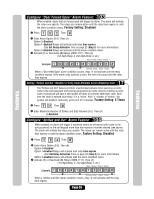
Features Features Configure "Door Forced Open" Alarm Feature: 103 When enabled, doors that are forced open will trigger an alarm. The alarm will activate the relays you specify. The relays can remain active until the relay time expires or until the alarm condition clears. Factory Setting: Disabled 1 Press Then 2 Enter Alarm Option (0-2). Then (#) Option 0=Disabled Option 1=Enabled Relays will activate until relay time expires (See Set Relay Activation Time on page 23 (Step 3) for more information) Option 2=Enabled Relays will activate until the alarm condition clears 3 Activate (1) or Deactivate (0) Relays (0000-1111). Then (#) (1st digit=Relay 4, 2nd digit=Relay 3, etc.) Relay 4 Relay 3 Relay 2 Relay 1 Example: 1 2 Activate Deact Deact Deact 3 When a "Door Held Open" alarm condition occurs, relay "4" will activate until the relay condition expires. If the alarm relay controls a siren, the siren will sound until the relay time expires. 17 Setting "Strikes and Out" (Number of Entry Code Attempts before Disabling Unit): The "Strikes and Out" feature prohibits unauthorized persons from guessing an entry code or the unit password and entering programming mode. Anyone entering an entry code or password will have a set number of times to correctly enter their code. Each time the code is entered incorrectly, it is a "strike". After "x" number of "strikes", the system will disallow code entry at the unit for 3 minutes. Factory Setting: 3 Times 1 Press Then 2 Enter Maximum Number of Strikes and Outs Allowed (0-5). Then (#) 0=Disabled Configure "Strikes and Out" Alarm Feature: 104 When enabled, an alarm will trigger if someone enters an erroneous entry code or the unit password on the unit keypad more than the maximum number allowed (see above). The alarm will activate the relays you specify. The relays can remain active until the relay time expires or until the alarm condition clears. Factory Setting: Disabled 1 Press Then 2 Enter Alarm Option (0-2). Then (#) Option 0=Disabled Option 1=Enabled Relays will activate until relay time expires (See Set Relay Activation Time on page 23 (Step 3) for more information) Option 2=Enabled Relays will activate until the alarm condition clears 3 Activate (1) or Deactivate (0) Relays (0000-1111). Then (#) (1st digit=Relay 4, 2nd digit=Relay 3, etc.) Relay 4 Relay 3 Relay 2 Relay 1 Example: 1 2 Activate Deact Deact Deact 3 When a "Strikes and Out" alarm condition occurs, relay "4" will activate until the relay time expires. Page 55
-
 1
1 -
2
-
3
-
4
-
5
-
6
-
7
-
8
-
9
-
10
-
11
-
12
-
13
-
14
-
15
-
16
-
17
-
18
-
19
-
20
-
21
-
22
-
23
-
24
-
25
-
26
-
27
-
28
-
29
-
30
-
31
-
32
-
33
-
34
-
35
-
36
-
37
-
38
-
39
-
40
-
41
-
42
-
43
-
44
-
45
-
46
-
47
-
48
-
49
-
50
-
 51
51 -
 52
52 -
 53
53 -
 54
54 -
 55
55 -
 56
56 -
 57
57 -
 58
58 -
 59
59 -
 60
60 -
 61
61 -
62
-
63
-
64
-
65
-
66
-
67
-
68
-
69
-
70
-
71
-
72
-
73
-
74
-
75
-
76
-
77
-
78
-
79
-
80
 |
 |
