LiftMaster EL25 EL25-KEYPAD PROGRAMMING Manual - Page 38
Assign Utility Option: 58, Assign Special Use Entry Code at the Unit Keypad: 59, Factory Setting: Off
 |
View all LiftMaster EL25 manuals
Add to My Manuals
Save this manual to your list of manuals |
Page 38 highlights
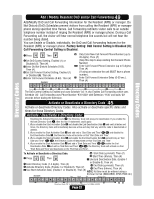
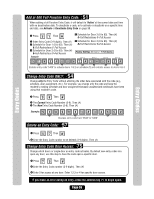
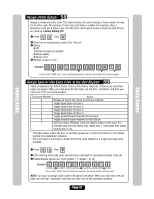
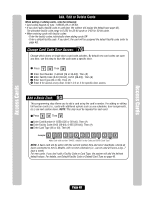
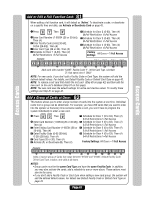
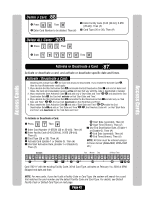
Entry Codes Entry Codes Assign Utility Option: 58 Assign a limited use entry code. This feature allows the user to assign a fixed number of uses for an entry code. The number of uses may reset daily or weekly. For example, allow a temporary code use 4 times a day. Use the never reset option to give a fixed use until all tries are used up. Factory Setting: Off 1 Press Then 2 Enter new or existing entry code (3-9). Then (#) 3 Option: 0=Off 1=Reset use daily at midnight 2=Reset weekly 3=Never reset 4 Number of uses (1-15) Example: 8 9 1 2 3 4 Entry Code "1394" has 1 use resetting weekly for direct commands from the keypad. Assign Special Use Entry Code at the Unit Keypad: 59 Table of responses for Action Codes: Voice is the primary response, if there is no voice then beeps are played. When you hold down the last digit, you will hear "command" and then you enter one of the command numbers. Command Number 0 1 2 3 4 5 6 7 Action Release all Doors and return to previous schedule Toggle Open/Close for Door 1 Toggle Open/Close for Door 2 Toggle Open/Close for Door 3 Toggle Open/Close for Door 4 Toggle Enable/Disable Resident Call Forward Toggle Enable/Disable Resident Do Not Disturb Get Door Status (Rolling). Each use reports status of next door. For example used once the status may report door 1, used again then status reports door 2, etc. * The Open status means the door is currently opened by a Latch Command or in the Unlock portion of an Automatic Schedule. **The commands 5 and 6 play a single short beep when enabled or a single long beep when disabled. 1 Press Then 2 Enter existing entry code (3-9) and hold down last digit for command prompts. Then (#) 3 Enable/Disable special use. Then (enable = 1, disable = 0) (#) Example: 9 9 1 2 3 Entry Code "1394" has the ability to execute an action at the main keypad. NOTE: You may not assign utility codes with special use ability. When you hold down the last digit, you will hear "command" and then you enter one of the command numbers. Page 37
-
 1
1 -
2
-
3
-
4
-
5
-
6
-
7
-
8
-
9
-
10
-
11
-
12
-
13
-
14
-
15
-
16
-
17
-
18
-
19
-
20
-
21
-
22
-
23
-
24
-
25
-
26
-
27
-
28
-
29
-
30
-
31
-
32
-
 33
33 -
 34
34 -
 35
35 -
 36
36 -
 37
37 -
 38
38 -
 39
39 -
 40
40 -
 41
41 -
 42
42 -
 43
43 -
44
-
45
-
46
-
47
-
48
-
49
-
50
-
51
-
52
-
53
-
54
-
55
-
56
-
57
-
58
-
59
-
60
-
61
-
62
-
63
-
64
-
65
-
66
-
67
-
68
-
69
-
70
-
71
-
72
-
73
-
74
-
75
-
76
-
77
-
78
-
79
-
80
 |
 |
