Linksys EPSX3 User Guide - Page 11
Bi-Admin, PrintServer Management - xp
 |
UPC - 745883548255
View all Linksys EPSX3 manuals
Add to My Manuals
Save this manual to your list of manuals |
Page 11 highlights
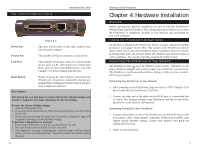
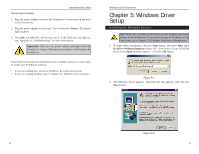
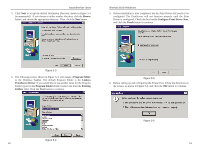
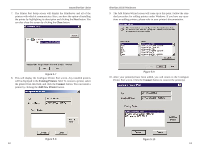
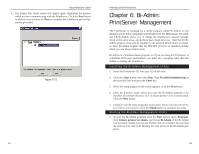
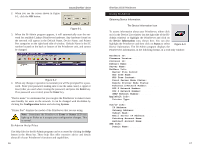
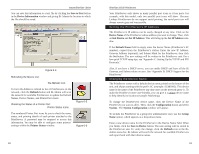
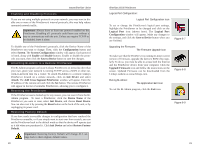
Instant EtherFast® Series 11. The Printer Port Setup screen will appear again, displaying the printers which are now communicating with the PrintServer. Click the Next button to add any more printers or Close to complete the installation and configuration procedure. Figure 5-11 14 EtherFast 10/100 PrintServers Chapter 6: Bi-Admin: PrintServer Management The PrintServer is managed by a utility program called Bi-Admin on the PrintServer CD. Fully compatible with Windows 95, 98, Millennium, NT, 2000, and XP, Bi-Admin allows you to change the PrintServer's internal settings, check on the unit's status, and perform basic diagnostic tests. Note that the BiAdmin program must only be installed on the network administrator's computer. Also, Bi-Admin requires that the IPX/SPX protocol be installed initially, which you can always remove later. Bi-Admin is a Windows-based program, so if you are using the PrintServer in a NetWare DOS-only environment, you must use a program other than BiAdmin to manage the PrintServer. Installing the Bi-Admin Management Utility 1. Insert the PrintServer CD into your CD-ROM drive. 2. Click the Start button and select Run. Type D:\utility\biadmin\setup in the provided field and press the Enter key. 3. When the setup program's title screen appears, click the Next button. 4. Enter the directory name where you want the Bi-Admin program to be installed. The default directory of C:\Linksys\printserver is recommended. Click the Next button. 5. Continue with the setup program's instructions. Setup will copy the necessary files to your system. Click the Finish button to complete the setup. Starting the Bi-Admin Management Utility 1. To start the Bi-Admin program, click the Start button, select Programs, click Linksys printserver admin, and choose Bi-Admin. If the Bi-Admin icon has been created, you can just double-click on it instead. You can drag the shortcut icon onto your Desktop for easy access to the Bi-Admin program. 15
-
 1
1 -
2
-
3
-
4
-
5
-
 6
6 -
 7
7 -
 8
8 -
 9
9 -
 10
10 -
 11
11 -
 12
12 -
 13
13 -
 14
14 -
 15
15 -
 16
16 -
17
-
18
-
19
-
20
-
21
-
22
-
23
-
24
-
25
-
26
-
27
-
28
-
29
-
30
-
31
-
32
-
33
-
34
-
35
-
36
-
37
-
38
-
39
-
40
 |
 |
