Linksys EPSX3 User Guide - Page 20
IP Address - defaults
 |
UPC - 745883548255
View all Linksys EPSX3 manuals
Add to My Manuals
Save this manual to your list of manuals |
Page 20 highlights
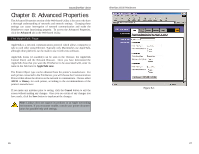
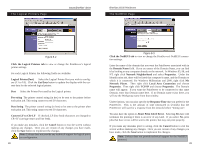
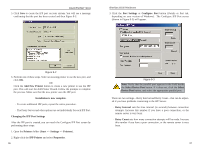
The SNMP Page Instant EtherFast® Series Figure 8-5 Click the SNMP tab to view or change the PrintServer's SNMP settings. The Print Server supports SNMP (Simple Network Management Protocol). This allows network supervisors to monitor and control the Print Server using network management platforms such as HP OpenView, IBM SystemView, etc. The appropriate MIB file must be imported into your SNMP management program using the Import-Compile command. Check your management program for details on this procedure. The MIB file is provided in the Mib folder on the CD-ROM. The name of the file is Mib2p.mib. General SysContact SysLocation Text Field - Name of the contact person. Text Field - Location of the contact person. Note: Linksys does not provide technical support for SNMP management. 32 EtherFast 10/100 PrintServers Management Stations Station No. Select the Management station (1-4) and click the Get Data button to update the display for the selected item. IP Address Enter the management station's IP Address, which has the SNMP program installed. Community This is a text field. Enter the name of the community, normally public or private. Access Select the desired level of access, Read-only, Read-Write, or Not Accessible. Trap Receivers Receiver No. Select the Trap Receiver number (1-4)-and click the Get Data button to update the display for the selected item. IP Address Enter the Trap Receiver's IP Address, where the Trap message will be sent. Community This is a text field. Enter the name of the community, normally public or private. Enable Check to enable; select the severity level. By default, all traps are level one. If you make any mistakes, click the Cancel button, to exit the screen without making any changes. Once you are certain of any changes you have made, click the Save button to implement the changes. 33
-
 1
1 -
2
-
3
-
4
-
5
-
6
-
7
-
8
-
9
-
10
-
11
-
12
-
13
-
14
-
 15
15 -
 16
16 -
 17
17 -
 18
18 -
 19
19 -
 20
20 -
 21
21 -
 22
22 -
 23
23 -
 24
24 -
 25
25 -
26
-
27
-
28
-
29
-
30
-
31
-
32
-
33
-
34
-
35
-
36
-
37
-
38
-
39
-
40
 |
 |
