Linksys WMB54G User Guide - Page 16
Setting Up the Bridge, Available Wireless Network. For most users. - manual
 |
UPC - 745883568949
View all Linksys WMB54G manuals
Add to My Manuals
Save this manual to your list of manuals |
Page 16 highlights
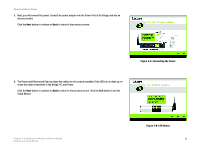
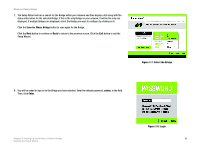
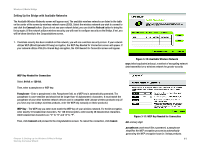
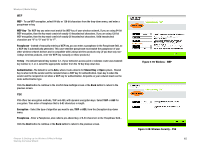
Wireless-G Music Bridge 9. You may change the password and the Bridge's name on this screen. Device Name. The default name for the Bridge will appear in the Device Name field. You may change the name by entering a new one in the Device Name field. The device name can be up to 19 characters. Password and Confirm. Enter a new password in the Password field, then enter it again in the Confirm field. The password must be between 4 to12 characters. Security Question and Your Answer. Select a security question and enter an answer in the Your Answer field, so you can retrieve your password if you forget it. Click the Next button to continue or Back to return to the previous screen. Setting Up the Bridge The next screen to appear will be the Available Wireless Network screen. This screen provides two options for setting up the Bridge. • Available Wireless Network. (For most users.) The networks available to this Bridge will be listed on this screen. You can choose one of these networks and click the Connect button to connect to it. Click the Refresh button to update the Available Wireless Network list. • Manual Setup. If your network is not listed on this screen, select Manual Setup to set up the Bridge manually. This method of setting up the Bridge is intended for Advanced Users only. • I only have a wired network. If you don't have a wireless network, select I only have a wired network and continue to step 7. Click Back to return to the previous page. The setup for each option is described, step by step, under the appropriate heading on the following pages. Figure 3-9: Change the Password Chapter 3: Setting up the Wireless-G Music Bridge 10 Starting the Setup Wizard
-
 1
1 -
2
-
3
-
4
-
5
-
6
-
7
-
8
-
9
-
10
-
 11
11 -
 12
12 -
 13
13 -
 14
14 -
 15
15 -
 16
16 -
 17
17 -
 18
18 -
 19
19 -
 20
20 -
 21
21 -
22
-
23
-
24
-
25
-
26
-
27
-
28
-
29
-
30
-
31
-
32
-
33
-
34
-
35
-
36
-
37
-
38
-
39
-
40
-
41
-
42
-
43
-
44
-
45
-
46
-
47
-
48
-
49
-
50
-
51
-
52
-
53
-
54
-
55
-
56
-
57
 |
 |
