Linksys WRT54GX2 User Guide - Page 15
Placement Options, Stand Option, Wall-Mount Option
 |
UPC - 745883566570
View all Linksys WRT54GX2 manuals
Add to My Manuals
Save this manual to your list of manuals |
Page 15 highlights
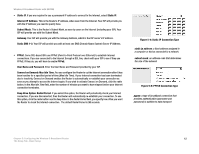
Wireless-G Broadband Router with SRX200 Placement Options There are three ways to place the Router. The first way is to place it horizontally on a surface, so it sits on its four rubber feet. The second way is to stand the Router vertically on a surface (this uses a stand). The third way is to mount it on a wall. The second and third options are explained in further detail below. Stand Option 1. Line up the center of the Router's stand with the center of the Router's labeled edge. 2. Insert the Router into the stand. Proceed to "Chapter 5: Configuring the Wireless-G Broadband Router." There are three ways to place the Router. The first way is to place it horizontally on a surface, so it sits on its four rubber feet. The second way is to stand the Router vertically on a surface (this uses an optional stand). The third way is to mount it on a wall. The second and third options are explained in further detail below. Wall-Mount Option The Router has two wall-mount slots on its back panel. 1. Determine where you want to mount the Router. 2. Drill two holes into the wall. Make sure the holes are 60 mm (2.36 inches) apart. 3. Insert a screw into each hole, and leave 5 mm (0.2 inches) of its head exposed. 4. Maneuver the Router so the wall-mount slots line up with the two screws. 5. Place the wall-mount slots over the screws and slide the Router down until the screws fit snugly into the wall- mount slots. Proceed to "Chapter 5: Configuring the Wireless-G Broadband Router." Chapter 4: Connecting the Wireless-G Broadband Router with SRX200 Placement Options Figure 4-4: Router's Stand 60 mm (2.36 inches) Figure 4-5: Wall-Mount Measurements 9
-
 1
1 -
2
-
3
-
4
-
5
-
6
-
7
-
8
-
9
-
 10
10 -
 11
11 -
 12
12 -
 13
13 -
 14
14 -
 15
15 -
 16
16 -
 17
17 -
 18
18 -
 19
19 -
 20
20 -
21
-
22
-
23
-
24
-
25
-
26
-
27
-
28
-
29
-
30
-
31
-
32
-
33
-
34
-
35
-
36
-
37
-
38
-
39
-
40
-
41
-
42
-
43
-
44
-
45
-
46
-
47
-
48
-
49
-
50
-
51
-
52
-
53
-
54
-
55
-
56
-
57
-
58
-
59
-
60
-
61
-
62
-
63
-
64
-
65
-
66
-
67
-
68
-
69
-
70
-
71
-
72
-
73
-
74
-
75
-
76
-
77
-
78
-
79
-
80
-
81
-
82
-
83
-
84
-
85
 |
 |
