Marantz SR7008 Owner's Manual in English - Page 224
Specifying the zone used with the remote control unit, ZONE SELECT, ENTER
 |
View all Marantz SR7008 manuals
Add to My Manuals
Save this manual to your list of manuals |
Page 224 highlights
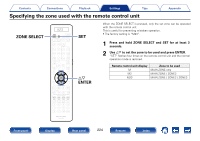
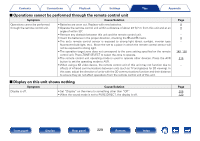
Contents Connections Playback Settings Tips Specifying the zone used with the remote control unit Appendix ZONE SELECT SET When the ZONE SELECT is pressed, only the set zone can be operated with the remote control unit. This is useful for preventing mistaken operation. • The factory setting is "M23". 1 Press and hold ZONE SELECT and SET for at least 3 seconds. 2 Use ui to set the zone to be used and press ENTER. "SET" flashes four times on the remote control unit and the normal operation mode is restored. ui ENTER Remote control unit display M M2 M23 Zone to be used MAIN ZONE only MAIN ZONE / ZONE2 MAIN ZONE / ZONE2 / ZONE3 Front panel Display Rear panel 224 Remote Index
-
 1
1 -
2
-
3
-
4
-
5
-
6
-
7
-
8
-
9
-
10
-
11
-
12
-
13
-
14
-
15
-
16
-
17
-
18
-
19
-
20
-
21
-
22
-
23
-
24
-
25
-
26
-
27
-
28
-
29
-
30
-
31
-
32
-
33
-
34
-
35
-
36
-
37
-
38
-
39
-
40
-
41
-
42
-
43
-
44
-
45
-
46
-
47
-
48
-
49
-
50
-
51
-
52
-
53
-
54
-
55
-
56
-
57
-
58
-
59
-
60
-
61
-
62
-
63
-
64
-
65
-
66
-
67
-
68
-
69
-
70
-
71
-
72
-
73
-
74
-
75
-
76
-
77
-
78
-
79
-
80
-
81
-
82
-
83
-
84
-
85
-
86
-
87
-
88
-
89
-
90
-
91
-
92
-
93
-
94
-
95
-
96
-
97
-
98
-
99
-
100
-
101
-
102
-
103
-
104
-
105
-
106
-
107
-
108
-
109
-
110
-
111
-
112
-
113
-
114
-
115
-
116
-
117
-
118
-
119
-
120
-
121
-
122
-
123
-
124
-
125
-
126
-
127
-
128
-
129
-
130
-
131
-
132
-
133
-
134
-
135
-
136
-
137
-
138
-
139
-
140
-
141
-
142
-
143
-
144
-
145
-
146
-
147
-
148
-
149
-
150
-
151
-
152
-
153
-
154
-
155
-
156
-
157
-
158
-
159
-
160
-
161
-
162
-
163
-
164
-
165
-
166
-
167
-
168
-
169
-
170
-
171
-
172
-
173
-
174
-
175
-
176
-
177
-
178
-
179
-
180
-
181
-
182
-
183
-
184
-
185
-
186
-
187
-
188
-
189
-
190
-
191
-
192
-
193
-
194
-
195
-
196
-
197
-
198
-
199
-
200
-
201
-
202
-
203
-
204
-
205
-
206
-
207
-
208
-
209
-
210
-
211
-
212
-
213
-
214
-
215
-
216
-
217
-
218
-
 219
219 -
 220
220 -
 221
221 -
 222
222 -
 223
223 -
 224
224 -
 225
225 -
 226
226 -
 227
227 -
 228
228 -
 229
229 -
230
-
231
-
232
-
233
-
234
-
235
-
236
-
237
-
238
-
239
-
240
-
241
-
242
-
243
-
244
-
245
-
246
-
247
-
248
-
249
-
250
-
251
-
252
-
253
-
254
-
255
-
256
-
257
-
258
-
259
-
260
-
261
-
262
-
263
-
264
-
265
-
266
-
267
-
268
-
269
-
270
-
271
-
272
-
273
-
274
-
275
-
276
-
277
-
278
-
279
-
280
-
281
-
282
-
283
-
284
-
285
-
286
 |
 |

224
Appendix
Tips
Playback
Connections
Contents
Front panel
Display
Rear panel
Index
Remote
Settings
Specifying the zone used with the remote control unit
SET
ZONE SELECT
ui
ENTER
When the ZONE SELECT is pressed, only the set zone can be operated
with the remote control unit.
This is useful for preventing mistaken operation.
•
The factory setting is “M23”.
1
Press and hold ZONE SELECT and SET for at least 3
seconds.
2
Use
ui
to set the zone to be used and press ENTER.
“SET” flashes four times on the remote control unit and the normal
operation mode is restored.
Remote control unit display
Zone to be used
M
MAIN ZONE only
M2
MAIN ZONE / ZONE2
M23
MAIN ZONE / ZONE2 / ZONE3