Marantz SR7008 Owner's Manual in English - Page 58
Connecting the power cord
 |
View all Marantz SR7008 manuals
Add to My Manuals
Save this manual to your list of manuals |
Page 58 highlights
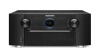
Contents Connections Playback Settings Connecting the power cord After completing all the connections, insert the power plug into the power outlet. Tips Appendix Front panel Display (ASSIGNABLE) 4 GAME 5 MEDIA PLAYER 6 AUX2 COMPONENT VIDEO IN (ASSIGNABLE) 3 Blu-ray Y PB/ CB PR/ CR ZONE2 HDMI OUT MONITOR1 MONITOR2 ARC AC IN MONITOR/ZONE2 COMPONENT VIDEO OUT PRE OUT CENTER SURROUND SURROUND BACK FRONT HEIGHT FRONT WIDE SUBWOOFER1 SUBWOOFER2 ASSIGNABLE ASSIGNABLE IMPEDANCE : 6~8Ω ASSIGNABLE CLASS 2 WIRING To household power outlet (AC 120 V, 60 Hz) Power cord (supplied) Rear panel 58 Remote Index
-
 1
1 -
2
-
3
-
4
-
5
-
6
-
7
-
8
-
9
-
10
-
11
-
12
-
13
-
14
-
15
-
16
-
17
-
18
-
19
-
20
-
21
-
22
-
23
-
24
-
25
-
26
-
27
-
28
-
29
-
30
-
31
-
32
-
33
-
34
-
35
-
36
-
37
-
38
-
39
-
40
-
41
-
42
-
43
-
44
-
45
-
46
-
47
-
48
-
49
-
50
-
51
-
52
-
 53
53 -
 54
54 -
 55
55 -
 56
56 -
 57
57 -
 58
58 -
 59
59 -
 60
60 -
 61
61 -
 62
62 -
 63
63 -
64
-
65
-
66
-
67
-
68
-
69
-
70
-
71
-
72
-
73
-
74
-
75
-
76
-
77
-
78
-
79
-
80
-
81
-
82
-
83
-
84
-
85
-
86
-
87
-
88
-
89
-
90
-
91
-
92
-
93
-
94
-
95
-
96
-
97
-
98
-
99
-
100
-
101
-
102
-
103
-
104
-
105
-
106
-
107
-
108
-
109
-
110
-
111
-
112
-
113
-
114
-
115
-
116
-
117
-
118
-
119
-
120
-
121
-
122
-
123
-
124
-
125
-
126
-
127
-
128
-
129
-
130
-
131
-
132
-
133
-
134
-
135
-
136
-
137
-
138
-
139
-
140
-
141
-
142
-
143
-
144
-
145
-
146
-
147
-
148
-
149
-
150
-
151
-
152
-
153
-
154
-
155
-
156
-
157
-
158
-
159
-
160
-
161
-
162
-
163
-
164
-
165
-
166
-
167
-
168
-
169
-
170
-
171
-
172
-
173
-
174
-
175
-
176
-
177
-
178
-
179
-
180
-
181
-
182
-
183
-
184
-
185
-
186
-
187
-
188
-
189
-
190
-
191
-
192
-
193
-
194
-
195
-
196
-
197
-
198
-
199
-
200
-
201
-
202
-
203
-
204
-
205
-
206
-
207
-
208
-
209
-
210
-
211
-
212
-
213
-
214
-
215
-
216
-
217
-
218
-
219
-
220
-
221
-
222
-
223
-
224
-
225
-
226
-
227
-
228
-
229
-
230
-
231
-
232
-
233
-
234
-
235
-
236
-
237
-
238
-
239
-
240
-
241
-
242
-
243
-
244
-
245
-
246
-
247
-
248
-
249
-
250
-
251
-
252
-
253
-
254
-
255
-
256
-
257
-
258
-
259
-
260
-
261
-
262
-
263
-
264
-
265
-
266
-
267
-
268
-
269
-
270
-
271
-
272
-
273
-
274
-
275
-
276
-
277
-
278
-
279
-
280
-
281
-
282
-
283
-
284
-
285
-
286
 |
 |

58
Appendix
Tips
Settings
Playback
Contents
Front panel
Display
Rear panel
Index
Remote
Connections
Connecting the power cord
After completing all the connections, insert the power plug into the power outlet.
SURROUND
FRONT
HEIGHT
FRONT
WIDE
SURROUND
BACK
ENTER
4 GAME
5 MEDIA PLAYER
6 AUX2
P
R
/
C
R
P
B
/
C
B
3 Blu-ray
HDMI OUT
OMPONENT VIDEO OUT
PRE OUT
IN
(
ASSIGNABLE
)
MONITOR/ZONE2
GNABLE
)
CLASS 2 WIRING
IMPEDANCE : 6
~
8
Ω
WOOFER1
SUBWOOFER2
ZONE2
MONITOR2
ASSIGN
ABLE
ASSIGN
ABLE
ASSIGN
ABLE
ARC
MONITOR1
AC IN
To household power outlet
(AC 120 V, 60 Hz)
Power cord (supplied)