Netgear FSM726v2 FSM726v2 Setup Manual - Page 17
Advanced > Advanced Tools > Software Upgrade screen and checking the Software Version.
 |
View all Netgear FSM726v2 manuals
Add to My Manuals
Save this manual to your list of manuals |
Page 17 highlights
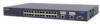
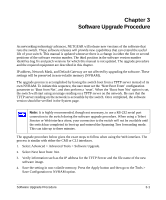
700 Series Software Manual v2.1 5. Restart the system via the Tools > Reset command. Bootstrap will retrieve the new software image then pass control to it. The system executes the new software image. The previous software image in non-volatile memory will not be replaced by the new software image. This enables you to return to the previous image if you do not like the new image. 6. Verify that the new software is loaded by going to the Advanced > Advanced Tools > Software Upgrade screen and checking the Software Version. Test your switch to make sure the new image is working correctly. If you decide to keep the new image, go to Software Upgrade again. Select the Next boot from: Net & Save option. 7. Save the setting in non-volatile memory. Press the Apply button, and then go to the Tools > Save Configuration to NVRAM option. 8. Restart the system via the Tools > Reset command The new image should overwrite the old image in NVRAM. Verify it by going to the Advanced > Advanced Tools > Software Upgrade screen and checking the Software Version. Software Upgrade Procedure 3-2
-
 1
1 -
2
-
3
-
4
-
5
-
6
-
7
-
8
-
9
-
10
-
11
-
 12
12 -
 13
13 -
 14
14 -
 15
15 -
 16
16 -
 17
17 -
 18
18 -
 19
19 -
 20
20 -
 21
21 -
 22
22 -
23
-
24
-
25
-
26
-
27
-
28
-
29
-
30
-
31
-
32
-
33
-
34
-
35
-
36
-
37
-
38
-
39
-
40
-
41
-
42
-
43
-
44
-
45
-
46
-
47
-
48
-
49
-
50
-
51
-
52
-
53
-
54
-
55
-
56
-
57
-
58
-
59
-
60
-
61
-
62
-
63
-
64
-
65
-
66
-
67
-
68
-
69
-
70
-
71
-
72
-
73
-
74
-
75
-
76
-
77
-
78
-
79
-
80
-
81
-
82
-
83
-
84
-
85
-
86
-
87
-
88
-
89
-
90
-
91
-
92
-
93
-
94
-
95
-
96
-
97
-
98
-
99
-
100
-
101
-
102
-
103
-
104
-
105
-
106
-
107
-
108
-
109
-
110
-
111
-
112
-
113
-
114
-
115
-
116
-
117
-
118
-
119
-
120
-
121
-
122
-
123
-
124
-
125
-
126
-
127
-
128
-
129
-
130
-
131
-
132
-
133
-
134
-
135
-
136
-
137
-
138
-
139
-
140
-
141
-
142
-
143
-
144
-
145
-
146
-
147
-
148
-
149
-
150
-
151
-
152
-
153
-
154
-
155
-
156
 |
 |
