Netgear WNDAP350 WNDAP350 User Manual - Page 31
Verifying Wireless Connectivity - ip address
 |
UPC - 606449064643
View all Netgear WNDAP350 manuals
Add to My Manuals
Save this manual to your list of manuals |
Page 31 highlights
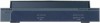
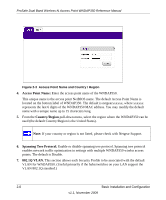
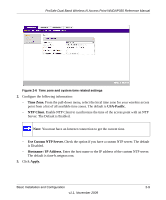
ProSafe Dual Band Wireless-N Access Point WNDAP350 Reference Manual 1. Disconnect the WNDAP350 and position it where it will be deployed. The best location is elevated, such as wall mounted or on the top of a cubicle, at the center of your wireless coverage area, and within line of sight of all the mobile devices. 2. Lift the antennae on either side so that they are vertical. Note: Refer to the antenna positioning and wireless mode configuration information in the Advanced Configuration chapter of the Reference Manual. 3. Connect an Ethernet cable from your WNDAP350 wirelss access point to a LAN port on your router, switch, or hub. Note: By default, WNDAP350 is set with the DHCP client disabled. If your network uses dynamic IP addresses, you must change this setting. To connect to the WNDAP350 after the DHCP server on your network assigns it a new IP address, enter the wireless access point name into your Web browser. The default wireless access point name is netgearxxxxxx, where xxxxxx represents the last 6 bytes of the MAC address. The default name is printed on the bottom label of the WNDAP350. 4. Connect the power adapter to the wireless access point and plug the power adapter in to a power outlet. The PWR, LAN, and Wireless LAN lights and should light up. Verifying Wireless Connectivity Using a computer with an 802.11b/bg/ng or 802.11a/na wireless adapter with the correct wireless settings needed to connect to the WNDAP350 (SSID, WEP/WPA, MAC ACL, etc.), verify connectivity by using a browser such as Mozilla Firefox or Internet Explorer to browse the Internet, or check for file and printer access on your network. The default SSID for the 802.11b/bg/ng wireless mode is NETGEAR_11g; the default SSID for the 802.11a/na mode is NETGEAR_11a. The SSID of any wireless access adapters must match the SSID configured in the ProSafe Dual Band Wireless-N Access Point WNDAP350. If they do not match, no wireless connection will be made. Note: If you are unable to connect, see Chapter 5, "Troubleshooting and Debugging." Basic Installation and Configuration v1.1, November 2009 2-11
-
 1
1 -
2
-
3
-
4
-
5
-
6
-
7
-
8
-
9
-
10
-
11
-
12
-
13
-
14
-
15
-
16
-
17
-
18
-
19
-
20
-
21
-
22
-
23
-
24
-
25
-
 26
26 -
 27
27 -
 28
28 -
 29
29 -
 30
30 -
 31
31 -
 32
32 -
 33
33 -
 34
34 -
 35
35 -
 36
36 -
37
-
38
-
39
-
40
-
41
-
42
-
43
-
44
-
45
-
46
-
47
-
48
-
49
-
50
-
51
-
52
-
53
-
54
-
55
-
56
-
57
-
58
-
59
-
60
-
61
-
62
-
63
-
64
-
65
-
66
-
67
-
68
-
69
-
70
-
71
-
72
-
73
-
74
-
75
-
76
-
77
-
78
-
79
-
80
-
81
-
82
-
83
-
84
-
85
-
86
-
87
-
88
-
89
-
90
-
91
-
92
-
93
-
94
-
95
-
96
-
97
-
98
-
99
-
100
-
101
-
102
-
103
-
104
-
105
-
106
-
107
-
108
-
109
-
110
-
111
-
112
-
113
-
114
-
115
-
116
-
117
-
118
-
119
-
120
-
121
-
122
-
123
-
124
-
125
-
126
-
127
-
128
-
129
-
130
-
131
-
132
-
133
-
134
-
135
-
136
 |
 |