Netgear WNDAP350 WNDAP350 User Manual - Page 36
Turn Radio On, Wireless Network Name SSID., Channel/Frequency, Appendix B, Related Documents - multiple ssid
 |
UPC - 606449064643
View all Netgear WNDAP350 manuals
Add to My Manuals
Save this manual to your list of manuals |
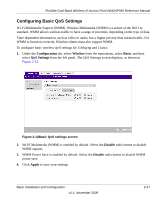
Page 36 highlights
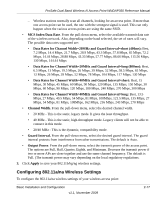
ProSafe Dual Band Wireless-N Access Point WNDAP350 Reference Manual - 11ng - All 11b, 11g, and 11ng wireless stations can be used. This is the default. If you select this option, then two additional options, Channel Width and Guard Interval, are displayed. Note: If you select one of these option and if other settings on this screen are disabled, then you must select the Turn Radio On radio button to enable available options on this screen. • Turn Radio On. On by default, you can also turn off the radio to disable access through this device. This can be helpful for configuration, network tuning, or troubleshooting activities. • Wireless Network Name (SSID). This is the name of your wireless network. It is set to the default name of NETGEAR_11a for 802.11a/n and NETGEAR_11g for 802.11b/bg/ ng. • Broadcast Wireless Network Name (SSID). If you disable broadcast of the SSID, only devices that have the correct SSID can connect. This nullifies the wireless network "discovery" feature of some products such as Windows XP, Vista and Unix systems but the data is still fully exposed to a determined snoop using specialized test equipment like wireless sniffers. Default is enabled. • Channel/Frequency. From the pull-down menu, select the channel you wish to use on your wireless LAN. The wireless channel in use will be between 1 to 11 for US and Canada, 1 to 13 for Europe and Australia. The default is channel Auto. It should not be necessary to change the wireless channel unless you experience interference (shown by lost connections and/or slow data transfers). Should this happen, you may need to experiment with different channels to see which is the best. Alternatively, you can select the Auto channel option for the AP to intelligently pick the channel with least interference. See the article on "Wireless Channels" available on the NETGEAR website. (A link to this article and other articles of interest can be found in Appendix B, "Related Documents."). When selecting or changing channels, some points to bear in mind: - Access points use a fixed channel. You can select the channel used. This allows you to choose a channel which provides the least interference and best performance. In the USA and Canada, 11 channels are available - If using multiple access points, it is better if adjacent access points use different channels to reduce interference. The recommended channel spacing between adjacent access points is 5 channels (for example, use channels 1 and 6, or 6 and 11). 2-16 Basic Installation and Configuration v1.1, November 2009
-
 1
1 -
2
-
3
-
4
-
5
-
6
-
7
-
8
-
9
-
10
-
11
-
12
-
13
-
14
-
15
-
16
-
17
-
18
-
19
-
20
-
21
-
22
-
23
-
24
-
25
-
26
-
27
-
28
-
29
-
30
-
 31
31 -
 32
32 -
 33
33 -
 34
34 -
 35
35 -
 36
36 -
 37
37 -
 38
38 -
 39
39 -
 40
40 -
 41
41 -
42
-
43
-
44
-
45
-
46
-
47
-
48
-
49
-
50
-
51
-
52
-
53
-
54
-
55
-
56
-
57
-
58
-
59
-
60
-
61
-
62
-
63
-
64
-
65
-
66
-
67
-
68
-
69
-
70
-
71
-
72
-
73
-
74
-
75
-
76
-
77
-
78
-
79
-
80
-
81
-
82
-
83
-
84
-
85
-
86
-
87
-
88
-
89
-
90
-
91
-
92
-
93
-
94
-
95
-
96
-
97
-
98
-
99
-
100
-
101
-
102
-
103
-
104
-
105
-
106
-
107
-
108
-
109
-
110
-
111
-
112
-
113
-
114
-
115
-
116
-
117
-
118
-
119
-
120
-
121
-
122
-
123
-
124
-
125
-
126
-
127
-
128
-
129
-
130
-
131
-
132
-
133
-
134
-
135
-
136
 |
 |
