NordicTrack Cxt 1200 Elliptical Uk Manual - Page 17
Important: The tar
 |
View all NordicTrack Cxt 1200 Elliptical manuals
Add to My Manuals
Save this manual to your list of manuals |
Page 17 highlights
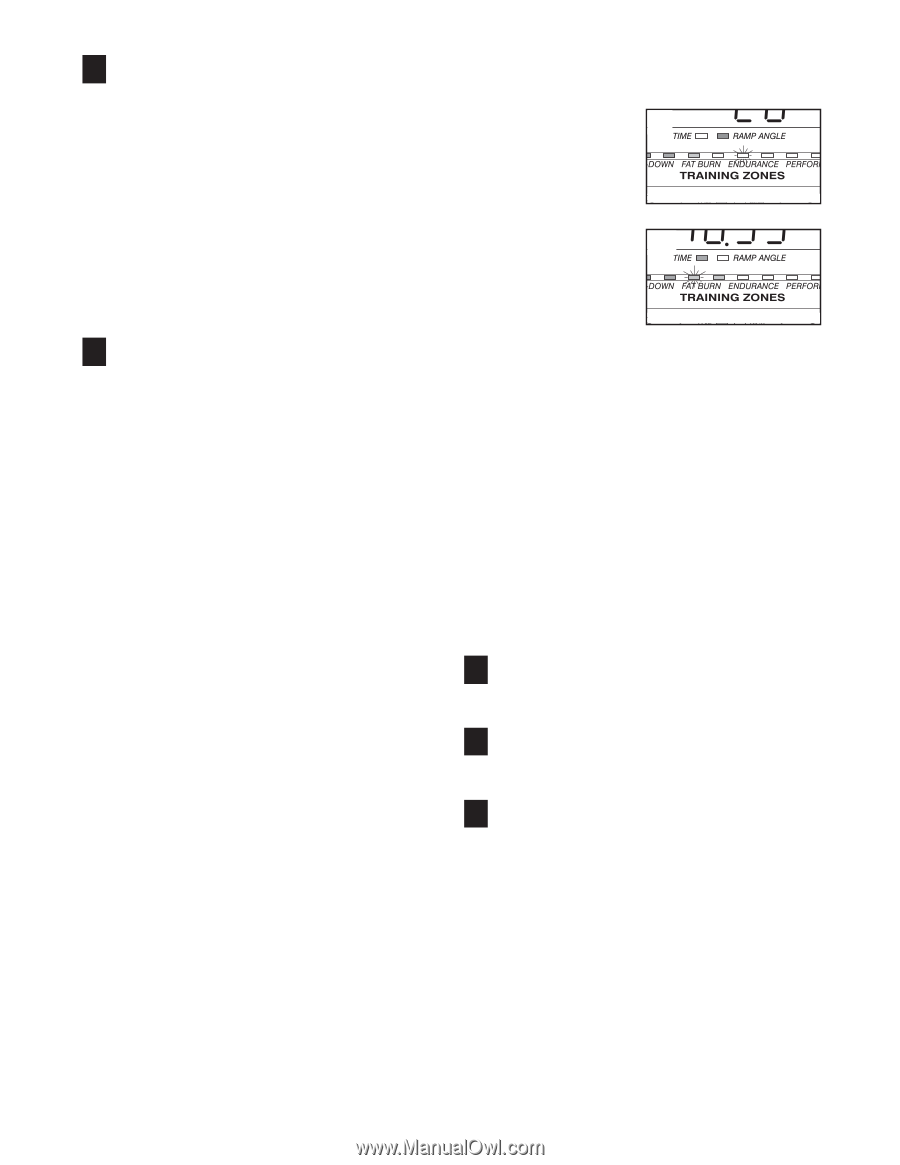
4 Wear the chest pulse sensor or hold the handgrip pulse sensor. To use the chest pulse sensor, see page 9. To use the handgrip pulse sensor, it is not necessary to hold the handgrips continuously during the program. However, you should hold the handgrips frequently for the program to operate properly. Each time you hold the handgrips, keep your hands on the metal contacts for at least 30 seconds. Note: When you are not holding the handgrips, the letters "PLS" will appear in the right side of the display instead of your heart rate. 5 Begin pedalling to start the program. Heart rate program 1 consists of 20 one-minute segments. One resistance setting and one target heart rate setting are programmed for each segment. (The same resistance setting and/or target heart rate setting may be programmed for two or more consecutive segments.) During the program, the resistance of the pedals will periodically change. Heart rate program 2 is 20 minutes long. The same resistance setting and target heart rate setting are programmed for the entire program. At the end of each segment, a series of tones will sound. The resistance of the pedals will then change if a different resistance setting is programmed for the next segment. Note: If the resistance is too high or too low, you can adjust the resistance by pressing the Resistance buttons. However, when the next segment begins, the resistance will automatically change if a different resistance setting is programmed for the next segment. As you exercise, the Training Zone bar will help you to keep your heart rate near the current target heart rate for the program. The lit indicators in the bar will show your actual pace. When you wear the chest pulse sensor or hold the handgrip pulse sensor, the console will periodically compare your heart rate to the current target heart rate; if necessary, an indicator in the bar will then flash to prompt you to increase or decrease your pace to bring your heart rate closer to the current target a heart rate. If an indicator to the right of the lit indi- cators is flashing (see drawing a), increase your b pace. If an indica- tor to the left of any lit indicator is flashing (see draw- ing b), decrease your pace. When no indicator is flashing, your heart rate is near the current target heart rate. Important: The tar- get heart rates are intended only to provide motivation. Your actual heart rate may be slower than the current target heart rate. Make sure to exercise at a pace that is com- fortable for you. The program will continue in this way until the main display shows that no time remains in the program. Note: If you stop pedalling for several seconds, a tone will sound and the program will end. Heart rate programs cannot be stopped temporarily and then restarted. 6 Monitor your progress with the main display. See step 4 on page 13. 7 Turn on the fan if desired. See step 6 on page 14. 8 When the program is finished, the console will automatically turn off. See step 7 on page 14. 17
-
 1
1 -
2
-
3
-
4
-
5
-
6
-
7
-
8
-
9
-
10
-
11
-
 12
12 -
 13
13 -
 14
14 -
 15
15 -
 16
16 -
 17
17 -
 18
18 -
 19
19 -
 20
20 -
 21
21 -
 22
22 -
23
-
24
-
25
-
26
-
27
-
28
-
29
-
30
-
31
-
32
 |
 |