Oki 62435901 User Manual - Page 56
Remote PC, USB Memory
 |
View all Oki 62435901 manuals
Add to My Manuals
Save this manual to your list of manuals |
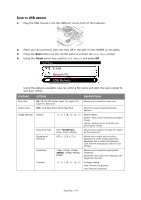
Page 56 highlights
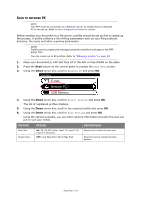
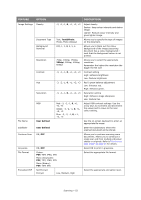
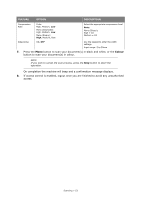
SCAN TO LOCAL PC You can save scanned data into your local computer. When you press the START button, the scan job starts and the ActKey utility and the scanner driver start automatically. You can send the scanned document to a specified application, save it into a specified folder, or send it by fax. The machine can be connected to USB interface or network, but only one computer can be connected at the same time. Refer to the Configuration Guide for details. NOTE > The scan to local PC function is available for Windows only. > Ensure that the Actkey Utility is installed and set up first. > User action is performed at the MFP (Push Scan). 1. Place your document(s) with text face UP in the ADF or face DOWN on the glass. 2. Press the Scan button on the control panel to prompt the Scan Menu screen. 3. Using the Down arrow key, scroll to Local PC and press OK. Scan Menu USB Memory Local PC Remote PC 4. If required, use the arrow keys to highlight Select A Connecting PC and press OK. 5. Using the arrow keys, highlight the appropriate connection option and press OK. Choose either: > From Network > From USB Interface 6. Using the Down arrow key, highlight Select An Application and press OK. The Select An Application screen displays the following options: > Application > Folder > PC-FAX 7. Select the option you require, followed by the Colour/Mono button to start scanning. (a) Application When the Application function is selected the PC's Actkey Utility executes PC Scan in accordance with your settings for "Scan to Application1". The scanned image data is opened in the application specified by the Actkey Utility for Application 1. (b) Folder When the Folder function is selected the Actkey Utility executes PC Scan in accordance with your settings for "Scan to Folder". The scanned image data is saved in the specified folder. Scanning > 56
-
 1
1 -
2
-
3
-
4
-
5
-
6
-
7
-
8
-
9
-
10
-
11
-
12
-
13
-
14
-
15
-
16
-
17
-
18
-
19
-
20
-
21
-
22
-
23
-
24
-
25
-
26
-
27
-
28
-
29
-
30
-
31
-
32
-
33
-
34
-
35
-
36
-
37
-
38
-
39
-
40
-
41
-
42
-
43
-
44
-
45
-
46
-
47
-
48
-
49
-
50
-
 51
51 -
 52
52 -
 53
53 -
 54
54 -
 55
55 -
 56
56 -
 57
57 -
 58
58 -
 59
59 -
 60
60 -
 61
61 -
62
-
63
-
64
-
65
-
66
-
67
-
68
-
69
-
70
-
71
-
72
-
73
-
74
-
75
-
76
-
77
-
78
-
79
-
80
-
81
-
82
-
83
-
84
-
85
-
86
-
87
-
88
-
89
-
90
-
91
-
92
-
93
-
94
-
95
-
96
-
97
-
98
-
99
-
100
-
101
-
102
-
103
-
104
-
105
-
106
-
107
-
108
-
109
-
110
-
111
-
112
-
113
-
114
-
115
-
116
-
117
-
118
-
119
-
120
-
121
-
122
-
123
-
124
-
125
-
126
-
127
-
128
-
129
-
130
-
131
-
132
-
133
-
134
-
135
-
136
-
137
-
138
-
139
-
140
-
141
-
142
-
143
-
144
-
145
-
146
-
147
-
148
-
149
-
150
-
151
-
152
-
153
-
154
-
155
-
156
-
157
-
158
-
159
-
160
-
161
-
162
-
163
-
164
-
165
-
166
 |
 |
