Oki B6100n Guide: Installation (B6100) - Page 14
Step 3: Locating Parts of the Printer
 |
View all Oki B6100n manuals
Add to My Manuals
Save this manual to your list of manuals |
Page 14 highlights
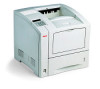
6 Oki B6100 Installation Guide Step 3: Locating Parts of the Printer Step 3: Locating Parts of the Printer The following figures indicate the names and functions of the main parts of the printer Figure 1-3: Front of the Printer. 1. Paper Exit Slot 2. Paper Output Tray 1 2 3 3. Control Panel 4 Provides access to all controls required to operate the printer. 5 4. Front Cover Provides access to the inside of the 6 printer, allows you to replace the toner cartridge or remove jammed paper. 7 5. Front Tray Provides an alternate method of 8 9 feeding paper to the printer. Accommodates various print media, including envelopes, transparencies, and labels. 6. Tray Extension Allows you to load large paper sizes in the front tray. 7. Power switch 8. 550-sheet Universal Paper Tray Holds paper from postcard size to Legal size. 9. Paper amount indicator Indicates the approximate remaining amount of paper. Figure 1-4: Rear of the Printer. 10. Top cover 10 11 Provides access to the inside of the printer; removing it allows you to install the offset catch tray. 11. Rear cover Provides access to the rear of the printer; allows you to remove jammed paper or install the duplexer. 12. Power cord connector 13. Ventilation slot 13 Releases hot air produced inside the 12 printer to prevent overheating. Oct 02
-
 1
1 -
2
-
3
-
4
-
5
-
6
-
7
-
8
-
 9
9 -
 10
10 -
 11
11 -
 12
12 -
 13
13 -
 14
14 -
 15
15 -
 16
16 -
 17
17 -
 18
18 -
 19
19 -
20
-
21
-
22
-
23
-
24
-
25
-
26
-
27
-
28
-
29
-
30
-
31
-
32
-
33
-
34
-
35
-
36
-
37
-
38
-
39
-
40
-
41
-
42
-
43
-
44
-
45
-
46
-
47
-
48
-
49
-
50
-
51
-
52
-
53
-
54
-
55
-
56
-
57
-
58
-
59
-
60
-
61
-
62
-
63
-
64
-
65
-
66
-
67
-
68
-
69
-
70
 |
 |
