Olympus C-60 Zoom C-60 Zoom Reference Manual - Page 128
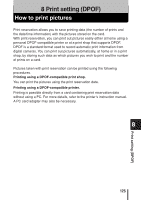
Applying print reservation to a card
 |
View all Olympus C-60 Zoom manuals
Add to My Manuals
Save this manual to your list of manuals |
Page 128 highlights
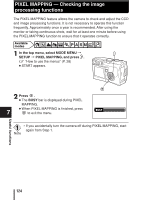
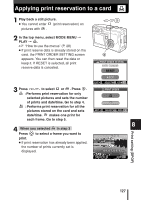
Applying print reservation to a card 1 Play back a still picture. ● You cannot enter (print reservation) on pictures with . 2 In the top menu, select MODE MENU T PLAY T . ~ "How to use the menus" (P. 28) ● If print reserve data is already stored on the card, the PRINT ORDER SETTING screen appears. You can then reset the data or keep it. If RESET is selected, all print reserve data is canceled. 3 Press to select or . Press . :Performs print reservation for only selected pictures and sets the number of prints and date/time. Go to step 4. : Performs print reservation for all the pictures stored on the card and sets date/time. makes one print for each frame. Go to step 5. 4 When you selected in step 3 Press to select a frame you want to print. ● If print reservation has already been applied, the number of prints currently set is displayed. PRINT ORDER SETTING PRINT ORDERED RESET KEEP EXIT SELECT GO PRINT ORDER EXIT SELECT GO 8 0 100-0018 HQ '04.07.01 12:30 18 SELECT GO Print setting (DPOF) 127
-
 1
1 -
2
-
3
-
4
-
5
-
6
-
7
-
8
-
9
-
10
-
11
-
12
-
13
-
14
-
15
-
16
-
17
-
18
-
19
-
20
-
21
-
22
-
23
-
24
-
25
-
26
-
27
-
28
-
29
-
30
-
31
-
32
-
33
-
34
-
35
-
36
-
37
-
38
-
39
-
40
-
41
-
42
-
43
-
44
-
45
-
46
-
47
-
48
-
49
-
50
-
51
-
52
-
53
-
54
-
55
-
56
-
57
-
58
-
59
-
60
-
61
-
62
-
63
-
64
-
65
-
66
-
67
-
68
-
69
-
70
-
71
-
72
-
73
-
74
-
75
-
76
-
77
-
78
-
79
-
80
-
81
-
82
-
83
-
84
-
85
-
86
-
87
-
88
-
89
-
90
-
91
-
92
-
93
-
94
-
95
-
96
-
97
-
98
-
99
-
100
-
101
-
102
-
103
-
104
-
105
-
106
-
107
-
108
-
109
-
110
-
111
-
112
-
113
-
114
-
115
-
116
-
117
-
118
-
119
-
120
-
121
-
122
-
 123
123 -
 124
124 -
 125
125 -
 126
126 -
 127
127 -
 128
128 -
 129
129 -
 130
130 -
 131
131 -
 132
132 -
 133
133 -
134
-
135
-
136
-
137
-
138
-
139
-
140
-
141
-
142
-
143
-
144
-
145
-
146
-
147
-
148
-
149
-
150
-
151
-
152
-
153
-
154
-
155
-
156
-
157
-
158
-
159
-
160
-
161
-
162
-
163
-
164
-
165
-
166
-
167
-
168
-
169
-
170
-
171
-
172
-
173
-
174
-
175
-
176
-
177
-
178
-
179
-
180
-
181
-
182
-
183
-
184
-
185
-
186
-
187
-
188
-
189
-
190
-
191
-
192
-
193
-
194
-
195
-
196
-
197
-
198
-
199
-
200
-
201
-
202
-
203
-
204
-
205
 |
 |
