Olympus C-60 Zoom C-60 Zoom Reference Manual - Page 131
Connecting the camera to a printer
 |
View all Olympus C-60 Zoom manuals
Add to My Manuals
Save this manual to your list of manuals |
Page 131 highlights
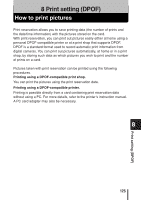
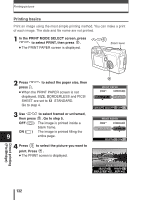
Connecting the camera to a printer Use the USB cable provided to connect the camera to a PictBridgecompatible printer. 1 Turn the printer on and plug the printer end of the USB cable into the printer's USB port. ● For details on how to turn the printer on and the position of the USB port, refer to the printer's instruction manual. 2 Plug the USB cable into the camera's USB connector. ● The camera turns on automatically. ● The camera's monitor turns on and the selection screen for the USB connection is displayed. USB connector 3 Press . to select PRINT, then press ● ONE MOMENT is displayed and the camera and printer are connected. The PRINT MODE SELECT screen is displayed on the monitor. Make the print settings on the camera's monitor. Go to "Printing pictures" (P. 131). USB P C PRINT EXIT 9 • If PC is selected in step 3, the PRINT MODE SELECT screen is not displayed. If the screen is not displayed after several minutes, unplug Note the USB cable from the camera and start again from step 1. Direct printing (PictBridge) 130
-
 1
1 -
2
-
3
-
4
-
5
-
6
-
7
-
8
-
9
-
10
-
11
-
12
-
13
-
14
-
15
-
16
-
17
-
18
-
19
-
20
-
21
-
22
-
23
-
24
-
25
-
26
-
27
-
28
-
29
-
30
-
31
-
32
-
33
-
34
-
35
-
36
-
37
-
38
-
39
-
40
-
41
-
42
-
43
-
44
-
45
-
46
-
47
-
48
-
49
-
50
-
51
-
52
-
53
-
54
-
55
-
56
-
57
-
58
-
59
-
60
-
61
-
62
-
63
-
64
-
65
-
66
-
67
-
68
-
69
-
70
-
71
-
72
-
73
-
74
-
75
-
76
-
77
-
78
-
79
-
80
-
81
-
82
-
83
-
84
-
85
-
86
-
87
-
88
-
89
-
90
-
91
-
92
-
93
-
94
-
95
-
96
-
97
-
98
-
99
-
100
-
101
-
102
-
103
-
104
-
105
-
106
-
107
-
108
-
109
-
110
-
111
-
112
-
113
-
114
-
115
-
116
-
117
-
118
-
119
-
120
-
121
-
122
-
123
-
124
-
125
-
 126
126 -
 127
127 -
 128
128 -
 129
129 -
 130
130 -
 131
131 -
 132
132 -
 133
133 -
 134
134 -
 135
135 -
 136
136 -
137
-
138
-
139
-
140
-
141
-
142
-
143
-
144
-
145
-
146
-
147
-
148
-
149
-
150
-
151
-
152
-
153
-
154
-
155
-
156
-
157
-
158
-
159
-
160
-
161
-
162
-
163
-
164
-
165
-
166
-
167
-
168
-
169
-
170
-
171
-
172
-
173
-
174
-
175
-
176
-
177
-
178
-
179
-
180
-
181
-
182
-
183
-
184
-
185
-
186
-
187
-
188
-
189
-
190
-
191
-
192
-
193
-
194
-
195
-
196
-
197
-
198
-
199
-
200
-
201
-
202
-
203
-
204
-
205
 |
 |
