Onkyo TX-NR747 User Manual - Page 93
Firmware Update, Updating the Firmware via Network, Update
 |
View all Onkyo TX-NR747 manuals
Add to My Manuals
Save this manual to your list of manuals |
Page 93 highlights
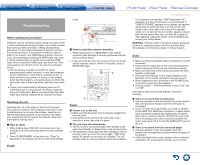
Firmware Update About Firmware Update There are two methods for updating the firmware; via network and via USB. Use the one that best suits your environment. ●● For the latest information on updates, visit the Onkyo website. ●● Before updating, make sure that the speaker setup microphone is not connected. ●● During an update, do not - Disconnect and reconnect any cable, USB storage device, speaker setup microphone or headphones, or perform any operation on the component such as turn off its power - Access to this unit from a PC or smartphone using Android application ●● The update may take about 30 minutes to complete for either method: via network or via USB. Furthermore, existing settings are guaranteed regardless of the method used for update. Disclaimer: The program and accompanying online documentation are furnished to you for use at your own risk. Onkyo will not be liable and you will have no remedy for damages for any claim of any kind whatsoever concerning your use of the program or the accompanying online documentation, regardless of legal theory, and whether arising in tort or contract. In no event will Onkyo be liable to you or any third party for any special, indirect, incidental, or consequential damages of any kind, including, but not limited to, compensation, reimbursement or damages on account of the loss of present or prospective profits, loss of data, or for any other reason whatsoever. Updating the Firmware via Network Before Starting ●● Check that the unit is turned on, and the connection to the Internet is secured. ●● Turn off the controller component (PC etc.) connected to the network. ●● Stop any playing Internet radio, USB storage device, or server content. ●● If the multi-zone function is active, press OFF on the main unit to turn it off. ●● If "HDMI CEC (RIHD)" is set to "On", set it to "Off" (default value). - After pressing RECEIVER on the remote controller, press SETUP. Then, after selecting "6. Hardware" - "HDMI" and pressing ENTER, select "HDMI CEC (RIHD)" to select "Off". ½½The description may differ from the on-screen display but that will not change the way to operate or the function. „„Update 1. After pressing RECEIVER on the remote controller, press SETUP. Firmware Update The Setup menu is displayed on the TV screen. Setup 1. Input/Output Assign 2. Speaker 3. Audio Adjust 4. Source 5. Listening Mode Preset 6. Hardware 7. Remote Controller 8. Miscellaneous 1. TV Out 2.HDMI Input 3. Video Input 4. Digital Audio Input 2. With the cursors, select "8. Miscellaneous" - "Firmware Update" - "Update via NET", and then press ENTER. Setup 1. Input/Output Assign 2. Speaker 3. Audio Adjust 4. Source 5. Listening Mode Preset 6. Hardware 7. Remote Controller 8. Miscellaneous 1. Firmware Update 2. Initial Setup 3. Lock ●● If "Firmware Update" is grayed out and cannot be selected, wait for a while until it starts up. ●● You will not be able to select "Update via NET" if there is nothing to update. 3. Press ENTER with "Update" selected to start update. ●● During the update, the TV screen may go black depending on the updated program. In that case, check the progress on the display of the unit. The TV screen will remain black until the update is complete and the power is turned on again. ●● "Completed!" is displayed when the update is complete. 4. Press ON/STANDBY on the main unit to turn the unit into standby mode. The process is completed and your firmware is updated to the latest version. ●● Do not use RECEIVER on the remote controller. En-61
-
 1
1 -
2
-
3
-
4
-
5
-
6
-
7
-
8
-
9
-
10
-
11
-
12
-
13
-
14
-
15
-
16
-
17
-
18
-
19
-
20
-
21
-
22
-
23
-
24
-
25
-
26
-
27
-
28
-
29
-
30
-
31
-
32
-
33
-
34
-
35
-
36
-
37
-
38
-
39
-
40
-
41
-
42
-
43
-
44
-
45
-
46
-
47
-
48
-
49
-
50
-
51
-
52
-
53
-
54
-
55
-
56
-
57
-
58
-
59
-
60
-
61
-
62
-
63
-
64
-
65
-
66
-
67
-
68
-
69
-
70
-
71
-
72
-
73
-
74
-
75
-
76
-
77
-
78
-
79
-
80
-
81
-
82
-
83
-
84
-
85
-
86
-
87
-
 88
88 -
 89
89 -
 90
90 -
 91
91 -
 92
92 -
 93
93 -
 94
94 -
 95
95 -
 96
96 -
 97
97 -
 98
98 -
99
-
100
-
101
-
102
-
103
-
104
-
105
-
106
-
107
-
108
-
109
-
110
-
111
-
112
-
113
-
114
-
115
-
116
-
117
-
118
-
119
-
120
-
121
-
122
-
123
-
124
-
125
-
126
-
127
-
128
-
129
-
130
-
131
-
132
-
133
 |
 |