Optoma EH319UST User manual - Page 15
Step 3: Attach the projector to the mount
 |
View all Optoma EH319UST manuals
Add to My Manuals
Save this manual to your list of manuals |
Page 15 highlights
Step 3: Attach the projector to the mount Lift the projector and mounting plate in to position - Fig 3A Lift the projector so the two hooks slip over the protrusions on the black molding - Fig 3B Position the washer C and teardrop shaped locking washer D against the hooks - Fig 3C Insert bolt B (M8 x 75mm) and tighten it using the one of the allen keys provided - Fig 3D 15
-
 1
1 -
2
-
3
-
4
-
5
-
6
-
7
-
8
-
9
-
 10
10 -
 11
11 -
 12
12 -
 13
13 -
 14
14 -
 15
15 -
 16
16 -
 17
17 -
 18
18 -
 19
19 -
 20
20 -
21
-
22
-
23
-
24
-
25
-
26
-
27
-
28
-
29
-
30
-
31
-
32
-
33
-
34
-
35
-
36
-
37
-
38
-
39
-
40
-
41
-
42
 |
 |

15
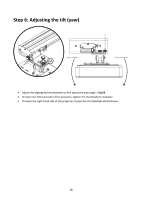
Step 3: Attach the projector to the mount
Lift the projector and mounting plate in to position
–
Fig 3A
Lift the projector so the two hooks slip over the protrusions on the black molding
–
Fig 3B
Position the washer
C
and teardrop shaped locking washer
D
against the hooks
–
Fig 3C
Insert bolt
B
(M8 x 75mm) and tighten it using the one of the allen keys provided
–
Fig 3D