Optoma EH319UST User manual - Page 27
located within the grey strip. You will see a little red dot on the dark grey line. Use the black
 |
View all Optoma EH319UST manuals
Add to My Manuals
Save this manual to your list of manuals |
Page 27 highlights
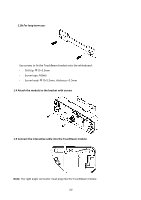
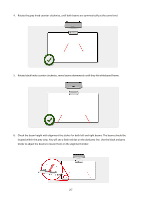
4. Rotate the grey knob counter-clockwise, until both beams are symmetrically at the same level. 5. Rotate black knob counter-clockwise, move beams downwards until they hit whiteboard frame. 6. Check the beam height with alignment the sticker for both left and right beams. The beams should be located within the grey strip. You will see a little red dot on the dark grey line. Use the black and grey knobs to adjust the beams to locate them on the alignment sticker. 27
-
 1
1 -
2
-
3
-
4
-
5
-
6
-
7
-
8
-
9
-
10
-
11
-
12
-
13
-
14
-
15
-
16
-
17
-
18
-
19
-
20
-
21
-
 22
22 -
 23
23 -
 24
24 -
 25
25 -
 26
26 -
 27
27 -
 28
28 -
 29
29 -
 30
30 -
 31
31 -
 32
32 -
33
-
34
-
35
-
36
-
37
-
38
-
39
-
40
-
41
-
42
 |
 |

27
4.
Rotate the grey knob counter-clockwise, until both beams are symmetrically at the same level.
5.
Rotate black knob counter-clockwise, move beams downwards until they hit whiteboard frame.
6.
Check the beam height with alignment the sticker for both left and right beams. The beams should be
located within the grey strip. You will see a little red dot on the dark grey line. Use the black and grey
knobs to adjust the beams to locate them on the alignment sticker.