Optoma EH319UST User manual - Page 16
Step 4: Adjusting the projected image size
 |
View all Optoma EH319UST manuals
Add to My Manuals
Save this manual to your list of manuals |
Page 16 highlights
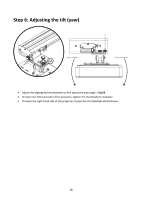
Step 4: Adjusting the projected image size Loosen the two bolts on the projector caddy - Fig 4A Loosen the bot on the fine length adjustor - Fig 4B Slide the caddy and fine adjuster together until the screen size is nearly correct - Fig 4C Tighten the fixing bolt on the fine adjuster - Fig 4D Adjust highlighted bolt to fine adjust the throw distance - Fig 4E To reduce the projected image size, tighten the bolt clockwise using one of the allen keys provided to move the projector closer to the screen To increase the projected image size, loosen the bolt anticlockwise using one of the allen keys provided to move the projector away from the screen Once fine adjustment is done. Tighten the two caddy mounting bolts - Fig 4F 16
-
 1
1 -
2
-
3
-
4
-
5
-
6
-
7
-
8
-
9
-
10
-
 11
11 -
 12
12 -
 13
13 -
 14
14 -
 15
15 -
 16
16 -
 17
17 -
 18
18 -
 19
19 -
 20
20 -
 21
21 -
22
-
23
-
24
-
25
-
26
-
27
-
28
-
29
-
30
-
31
-
32
-
33
-
34
-
35
-
36
-
37
-
38
-
39
-
40
-
41
-
42
 |
 |

16
Step 4: Adjusting the projected image size
Loosen the two bolts on the projector caddy
–
Fig 4A
Loosen the bot on the fine length adjustor
–
Fig 4B
Slide the caddy and fine adjuster together until the screen size is nearly correct
–
Fig 4C
Tighten the fixing bolt on the fine adjuster
–
Fig 4D
Adjust highlighted bolt to fine adjust the throw distance
–
Fig 4E
To reduce the projected image size, tighten the bolt clockwise using one of the allen keys
provided to move the projector closer to the screen
To increase the projected image size, loosen the bolt anticlockwise using one of the allen
keys provided to move the projector away from the screen
Once fine adjustment is done. Tighten the two caddy mounting bolts
–
Fig 4F