Optoma LH150 LH150 UM EN 022020 - Page 31
Image menu
 |
View all Optoma LH150 manuals
Add to My Manuals
Save this manual to your list of manuals |
Page 31 highlights
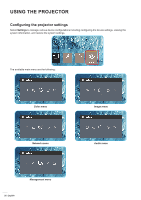
USING THE PROJECTOR Image menu Projection Mode Select the preferred projection mode from Front or Rear. Projection Location Select the preferred projection location from Desktop or Ceiling. Aspect Ratio Select the aspect ratio of the displayed image. ‡‡ Auto: Automatically selects the appropriate display format. ‡‡ 4:3: This format is for 4:3 input sources. ‡‡ 16:9: This format is for 16:9 input sources, like HDTV and DVD enhanced for Wide screen TV. ‡‡ L.Box: This format is for non-16x9, letterbox source and for users who use external 16x9 lens to display 2.35:1 aspect ratio using full resolution. Auto V. Keystone Turn the automatic keystone adjustment on or off. V. Keystone Adjust the keystone vertically and make a squarer image. Vertical keystone is used to correct a keystoned image shape in which the top and bottom are slanted to one of the sides. H. Keystone Adjust the keystone horizontally and make a squarer image. Horizontal keystone is used to correct a keystoned image shape in which the left and right borders of the image are unequal in length. 4 Corner Correction Allow the image to be squeezed to fit an area defined by moving each of the four corners' x and y position. HDMI Color Range Select an appropriate color range of the input signal. ‡‡ Auto: Automatically detect the color range of the input signal. ‡‡ Limited Range: Select this option if the color range of the input signal is from 16 to 235. ‡‡ Full Range: Select this option if the color range of the input signal is from 0 to 255. Note: This option is only available when the input source is HDMI. Digital Zoom Use to reduce or magnify an image on the projection screen. Reset Return the factory default settings for the Image settings. English 31
-
 1
1 -
2
-
3
-
4
-
5
-
6
-
7
-
8
-
9
-
10
-
11
-
12
-
13
-
14
-
15
-
16
-
17
-
18
-
19
-
20
-
21
-
22
-
23
-
24
-
25
-
 26
26 -
 27
27 -
 28
28 -
 29
29 -
 30
30 -
 31
31 -
 32
32 -
 33
33 -
 34
34 -
 35
35 -
 36
36 -
37
-
38
-
39
-
40
-
41
-
42
 |
 |
